|
SEAVAX - WATER TANK TEST FACILITIES
BRICKS & MORTAR - CARRIAGE - DRAINAGE - FACILITIES - FILTRATION - GLASS & PAINT - GANTRY - GIMBALS - HATCHES - HYDRODYNAMICS HISTORY - INSTRUMENTS - LABORATORY - LAMINATING - LOGISTICS - OUR TEST TANK - PROOFING - REVIEWS - SCREEDING - SEAVAX TEST VIDEOS - SLUICE GATE - SOLAR BATTERIES - WAVE MAKING - WIND MACHINE
|
|||||||||
|
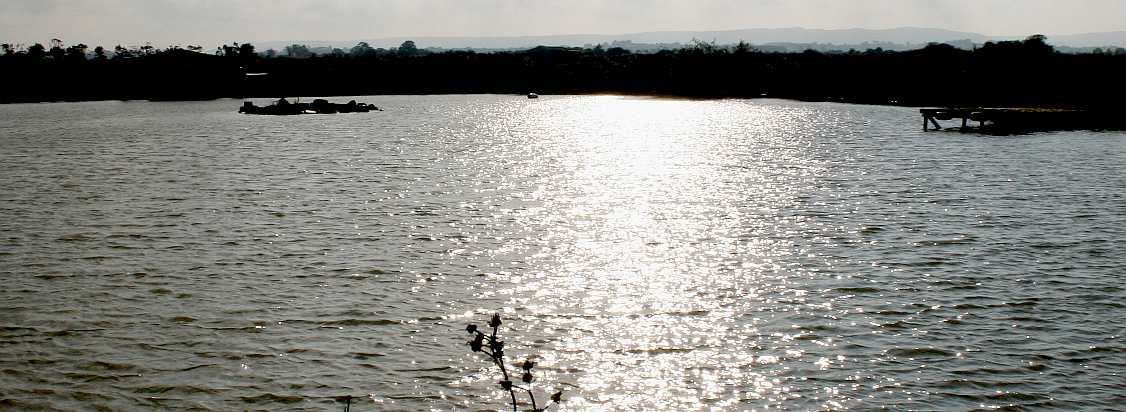
PRIVATE TRIALS - We use secure (controlled) locations to test our vessels in Sussex, in private in the real world. The picture directly above looks for all the world like Lake Dumbleyung in Australia in this light. Lake Dumbleyung is where Donald Campbell set the first of his unbeatable double achievement (land and water world speed records in the same year). Though the location is secure, the conditions are not.
CONTROLLED CONDITIONS - On these pages you can see how we took a near derelict turn of the (last) century site and converted it into our tank test facilities between April and June of 2016. This is a major stage in the development of the SeaVax/RiverVax series of anti-pollution craft. The beauty about using this site, is that once our testing is complete it can go back to being a greenhouse or other storage unit.
Water tanks and testing is hardly mainstream conversation, yet this highly specialized subject is also diverse, with each installation being virtually unique. For this reason we take a look at some of the variations, because we can learn something from every one - otherwise, they would all be the same of course.
Most tank testing facilities cost their institutions several million US $dollars or £pounds sterling. We simply do not have that kind of money for design confirmation tests. We pride ourselves on getting a job done as economically and simply as possible. Where the US Navy MASK test tank is probably the largest water basin in the world, it is possible that we are the smallest and most economical tank test facility in the world. We estimate conversion and equipment costs to be around $47,400 (including some shared equipment with the robotics lab).
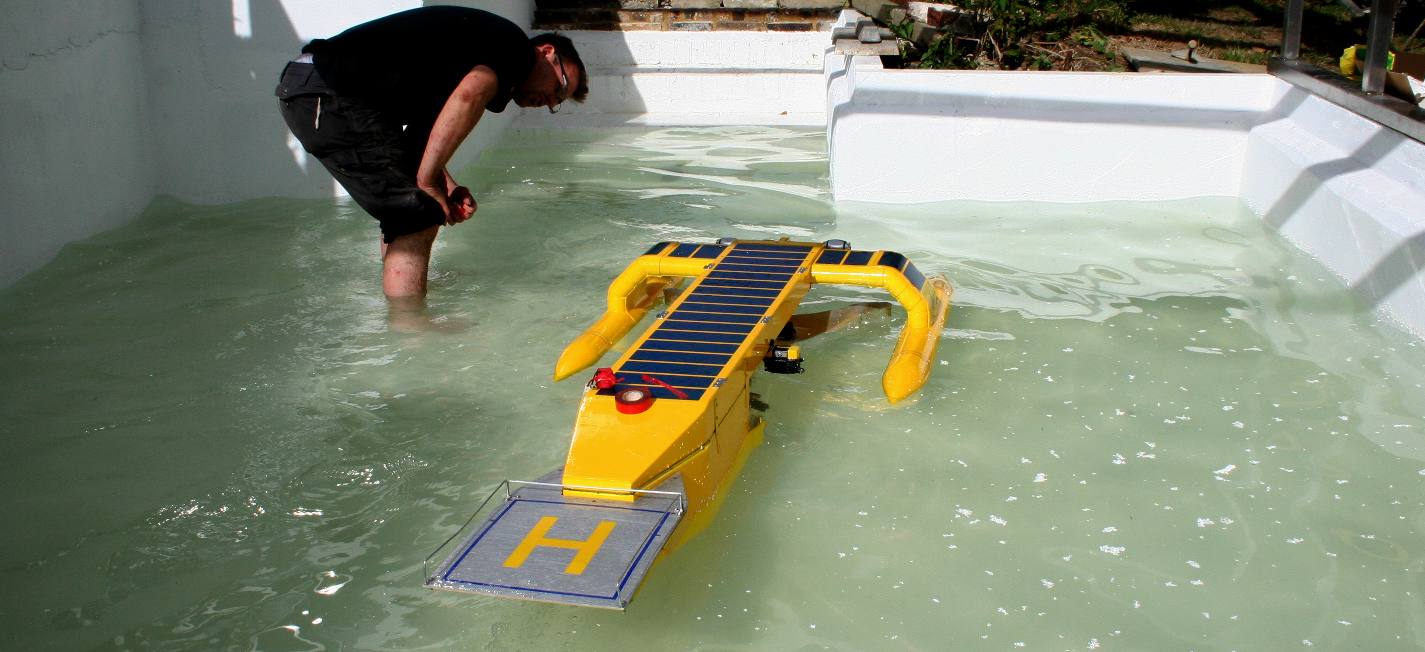
CHRIS HAS THAT FRIDAY FEELING - On the 29th of July, our proof of concept model made it into the test tank, sucked up plastic and filtered it out, passing clean water back into the tank. our sluice gate worked superbly with just a dribble on the left hand corner. We are fixing that by using more flexible 13mm thin wall silicone tubing. We tried a thick soft rubber hose (18mm) first and then a garden hose pipe (that strangely worked quite well), but the radius in the corners caused a kink that would not come out. Copyright © July 29 2016, all rights reserved. You will need permission from Bluebird Marine Systems Ltd to reproduce these photographs.
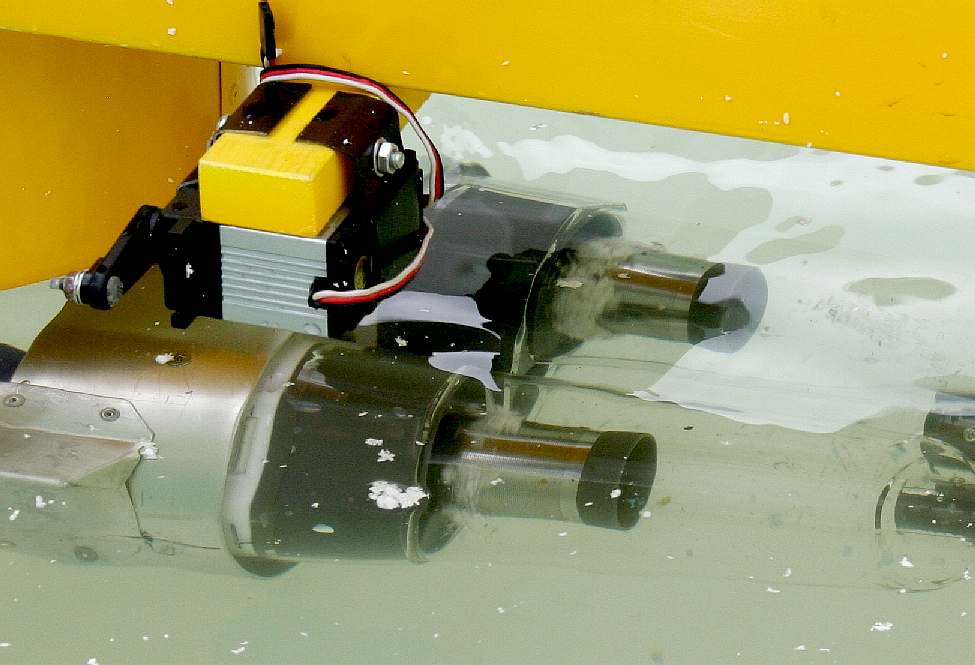
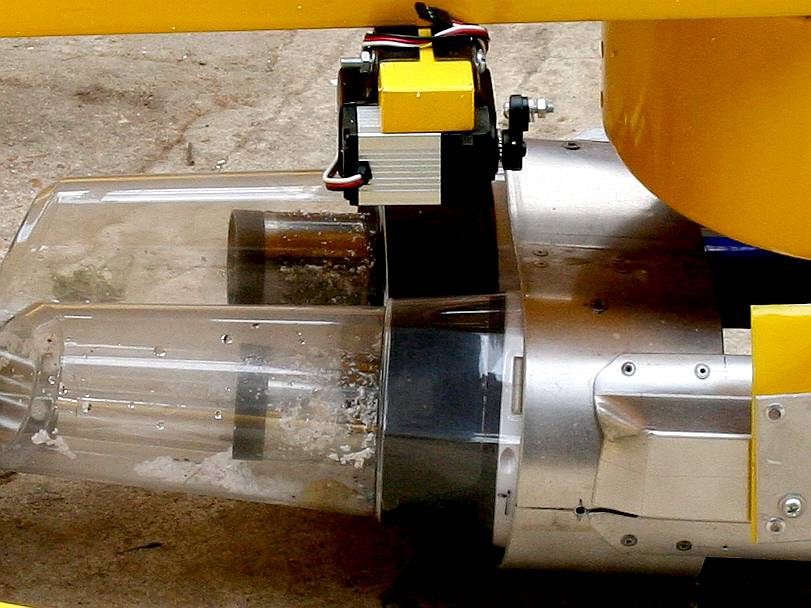
HYDROCYCLONES - [LEFT] Here we can see the hydrocyclones in action. We scattered plastic fragments onto the surface of our test tank and allowed the SeaVax to trawl slowly for a couple of minutes. You can see the plastic spinning in the twin chambers as water passes through. [RIGHT] Out of the water, we can see the solid plastic waste we have collected at the bottom of the chambers. For legal reasons we cannot reveal more about the processing at this stage. Copyright © July 29 2016, all rights reserved. You will need permission from Bluebird Marine Systems Ltd to reproduce these photographs.
FRIDAY 29th JULY 2016 - Chris Close, watches plastic being sucked into the SeaVax development model. It was a hot day but still the water was cold. That is why we are heating it for our testing programme. Copyright © July 29 2016, all rights reserved. You will need permission from Bluebird Marine Systems Ltd to reproduce these photographs.
ECONOMICS
What are the savings to the project? By way of example, the Berkeley Wave Tank (circa 1930's), which is basically a long narrow tank designed for pull testing of ship hulls costs about $1500/day to hire. A more modern wave tank costs around $10,000/day. As we will be conducting tests on our robot vessel routinely we would be looking at $300,000 dollars for 30 days of testing in 2016 - that is if we were to go the hire route.
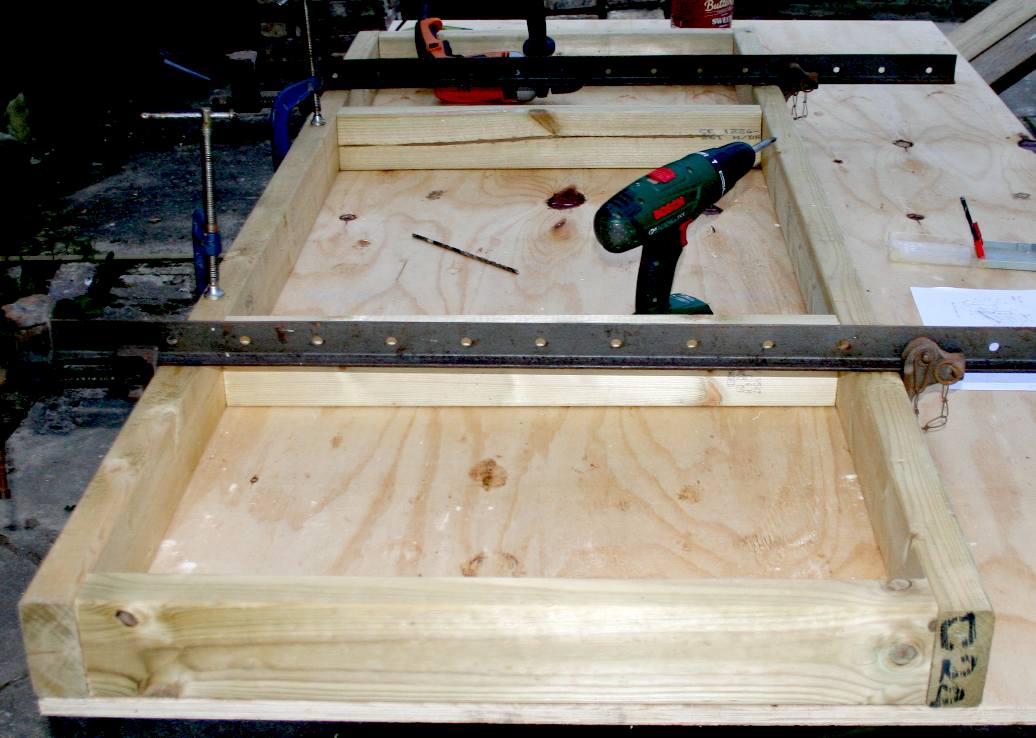
CONSTRUCTION - Putting up the stainless steel beams and uprights is a lot quicker than cutting the beams to size and fabrication. On site welding skills are the essential ingredient - that and a reliable tape measure and a spirit level.
Why do we need tanks to test out SeaVax when we have two ponds nearby for open water tests?
You are right to ask such a question - and yes the SeaVax floats perfectly as you can see from our open water test pictures. The answer though, is that in open water tests, there are many uncontrollable variables, due to the vagaries of nature. Far too many to run a series of tests on a low budget in a short time. On a pond (or even in the sea) we cannot create storm conditions and above on demand. Nor can we measure the forces on the boat as accurately - and recording the data is much harder. Most important of all, we cannot introduce plastic and other waste into a pond full of wildlife.
We must though establish some values to compare with the full size SeaVax. We are bound to find out more about the vessel's performance with these tests, that we cannot afford to find out full-size, when modifications become rather expensive. In a controlled environment we can see how effective SeaVax is at filtering out plastic and other contaminants. With a sluice gate for rapid emptying and cleaning, we can be back in business with clean water in a couple of hours.
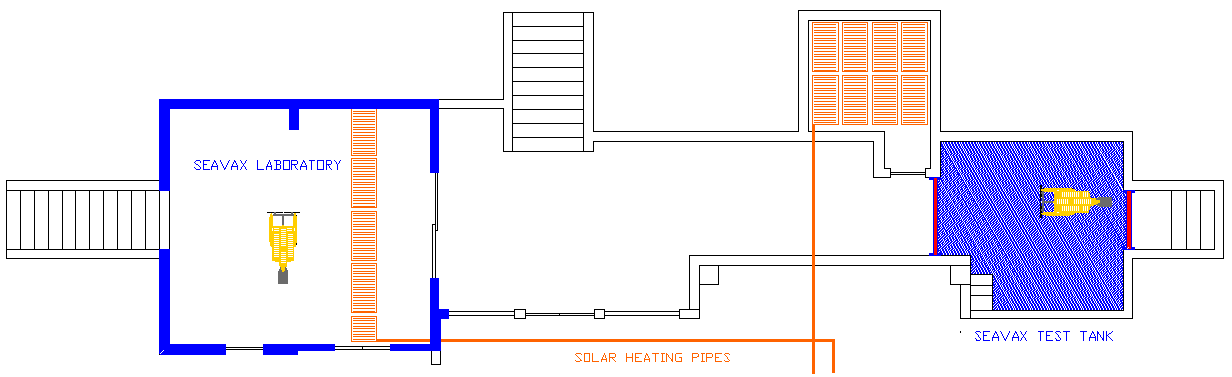
DEVELOPMENT FACILITIES - A diagram drawn to scale showing the proposed SeaVax laboratory (left) in relation to the test tank (right). These are in progress improvements to protected facilities that are being undertaken by volunteers as of late March 2016. SeaVax engineers need space to develop the electronics in a lab that is not subject to welding fumes, grinding grit and other dust that general purpose workshops suffer. It will be handy to have a test tank convenient to a robotics lab, that will save time out, transport costs and hire charges for water trials, such as docking and waste clearance performance trials. By making these building modifications ourselves, we will also save the project a shed load of money.
TANK TEST DOCKING - Shown in this diagram is a 1/4 section of a Handymax hull in 1/20th scale as a grey onlong, with our SeaVax proof of concept boat readying itself to dock. At this scale a complete Handymax (PlastiMax) hull would be around 7.7 meters (25ft) long. An overhead gantry will provide facilities to mount both the SeaVax and Handymax hull sections using three-axis mounts and a mix of sensing electronics, simple balances, and heel angle indicators including strain gauges for precise measurements. This view does not include the overhead gantry.
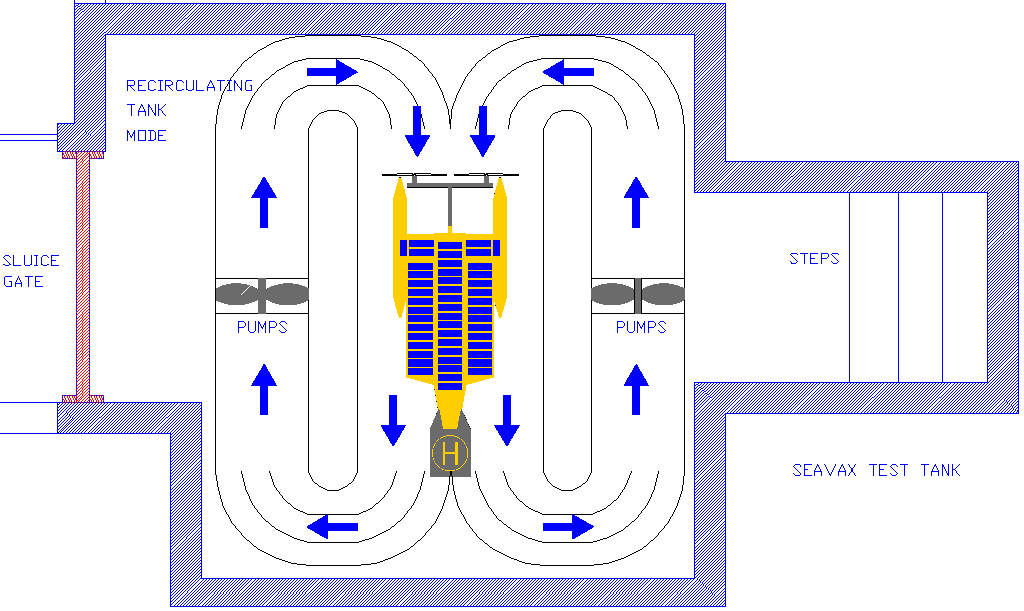
RECIRCULATING MODE - Twin pumps and a vane guide system are inserted into the water tank for hydrodynamic hull evaluations. This makes a closed loop water-chamber that offers a lot of options for experiments for considerably less expenditure. The results are sure to be less accurate compared to the $multi-million dollar installations seen on this page, but we can interpret our results to obtain meaningful data.
NECESSITY IS THE MOTHER OF INVENTION
There are two types of test tank:
A. Where the a boat model moves (is towed) through stationary water and B. Where circulating water moves around a stationary (suspended) model.
The largest and most expensive fall into category A. A tow tank, or water testing basin is basically like a long swimming pool, usually with a substantial steel gantry overhead to be able to suspend a model from and propel it across the water. Such a facility usually incorporates wave making facilities.
At time of writing (2-4-16) we cannot afford to hire conventional tow tanks for our testing, and we'd make rather a mess of them if we did, because we need to evaluate the mouth of the SeaVax vacuum head for collection performance - and this involves scattering plastic waste on and under the water surface. We also need to perfect our docking system, and that needs to be done before getting anywhere near the final (detail) design stage.
HOW MUCH? - From January to November of 2015, it cost us £138,000 to go from a clean sheet of paper to get to this stage (above) and attend our first exhibition in London. We can trickle along with our development never showing this or a full size demonstrator in public. But, with the support that has been demonstrated by the recent Avaaz campaign, we feel sure that we can keep up our present development pace, aiming for a the full size prototype, or at least making preparations for build towards the end of this year (2016) for 2017. We have found what we think is a suitable launch site not too far away from our workshops in Sussex. We still need more backing, but are hopeful that there are philanthropic corporations who may be able to top us up as we need it, or who might see this project as a priority for world food security.
TESTING, TESTING - An unusual use for a model ship basin, but 'Q' (Jamie) needed to check out the sound and video qualities of the test tank, before water is introduced into the equation. Chris is a qualified public speaker, so welcomed the chance to voice his opinions - in the process helping our techie familiarize himself with this equipment. Copyright © May 15 2016, all rights reserved. You will need permission from Bluebird Marine Systems Ltd to reproduce these photographs.
WHERE THEN?
The next question is where then to test SeaVax? We scouted pools all over Sussex, coming up against mess and clearance issues every time. Plus of course, some of our tests need to be conducted in private because of patent laws prohibiting publication before application in the UK (NOTE: In the USA they have a different system). Maintaining privacy would mean hiring a whole building and barring the owners staff, and that also, would not go down too well. The closest test facilities to us are in London Southampton and Plymouth.
The solution is to make a temporary tank at a location where we are permitted to make changes, provided that we restore the situation on completion of our testing programme. We found a suitable area that was difficult to get to, but this problem will be cured with the making of some steps.
We can also add water circulating pumps and guides. If we decide that this is beneficial, our tank will become a "circulating tank" and will allow us to calculate hull drag, without needing to tow the hull across a long tank. Well, as you can see we don't have any great length to play with, leaving us with little choice but to improvise.
GROUNDWORKS TIME LAPSE - In this video you can see how we took the base of an old building that had become overgrown and neglected, and removed the flora and accumulated rubbish to enable us to modify the layout for our test tank.
SEAVAX TANK SPECIFICATIONS
With a very limited budget, our shopping list will be curtailed:-
1. We need a water tank that is deep enough for our scoop to deploy fully underwater and allow us to film the boat in motion subsurface - while it is scooping up plastic.
2. We need to be able to empty and clean the tank quickly to get rid of one type of plastic and try other sizes and formulations. As far a we know this is unique to us.
3. We need to be able to cover the tank at night to stop birds and plant debris contaminating our experiments.
4. We need overhead and underwater lighting to be able to focus on experiments and capture every detail.
5. We need to be able to simulate storm conditions to test vessel stability and safety features, such as solar wing and wind turbine folding/furling - and the effectiveness of floodable compartments as a sea anchor.
6. We need to be able to measure forces on the SeaVax scale hull in these conditions, as well as calculating when plastic is collected most efficiently.
7. We need to be able to record footage of the SeaVax proof of concept boat in difficult conditions on the surface.
8. All of the above has to be achieved at the lowest cost to the project - and the site will have to be returned to an original state once the project is complete. It is to be a temporary installation.
RENDERING & BASE FRAMES - In this time-lapse video we compress up another team building bash, where the final rendering is complete, ready for us to install the repaired timber base frames. The next few videos will show the gantry supports going in and then finally we'll come on to developing the SeaVax proof of concept model. Hopefully, in June of 2016. The build has slightly overrun with some delay in sourcing materials. We made up for this by doing a feasibility study of the AmphiMax™, an amphibious launch platform that will save us a lot of time and money - if we can refine the design and cost it economically.
PAVING SLABS - Access to the test tank requires the making of steps where there is only a grass hill at the moment. Paving slabs would be ideal for this purpose. These slabs were donated to the cause on Sunday 27th March, but had to be collected from Burgess Hill using a trailer that already needed attention. Although only 26 miles away, the winding country roads made journey times longer - and it was raining (Storm Katie) and blowing a gale while loading and roping up, but we escaped the brunt of the storm. They were not so lucky in Brighton, with 106 mph winds lashing the coast, and a tree crushing the car seen above.
We are making the lab more accessible in wet weather by making steps, where at the moment there is just a grassy slope that gets slippery when it rains and let's not mention the mud. We needed to borrow the MDs car for this run, because none of the project vehicles (with towbars) are insured, MOT'd and taxed as yet (in the UK you must keep untaxed vehicles off-road on a SORN declaration). Our VW bus is fitted with a towbar, but is due for a makeover so that we may attend events later this year, hence is de-commissioned at the moment. The VW will include a custom built rig to display our robot boat on the revolving stand we built last year for Innovate 2015 (also on a shoestring budget), together with video presentations and a PA system to make us a fully functional educational ocean roadshow.
ARCHIVE
- We are using GoPro cameras in waterproof
housings, so getting wet will be par for the course. The HERO 4 Black Edition Action Camcorder shoots in 4k Ultra HD 3840 x 2160 footage for true-to-life pictures with razor sharp resolution and high fidelity audio.
Our IT expert, Jamie, used this to capture the action in time lapse for a
Youtube release in due course.
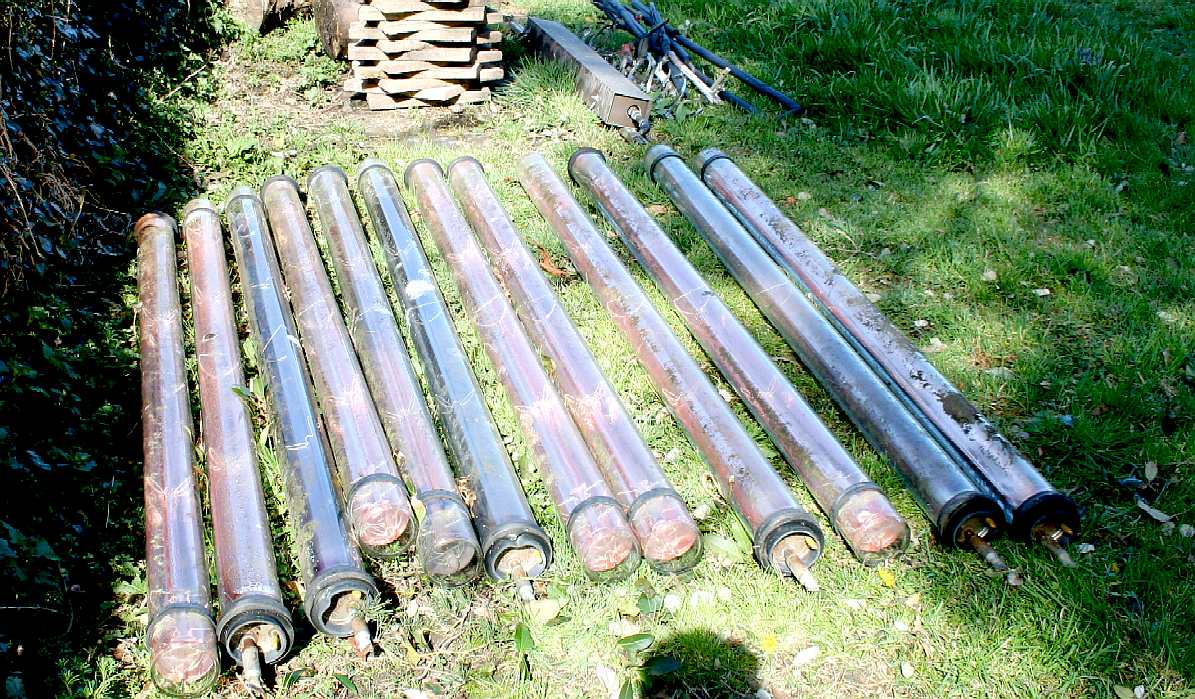
SOLAR WATER HEATING - These solar water heaters arrived on Good Friday (25-3-16), donated to the cause by a local benefactor, with our grateful thanks.
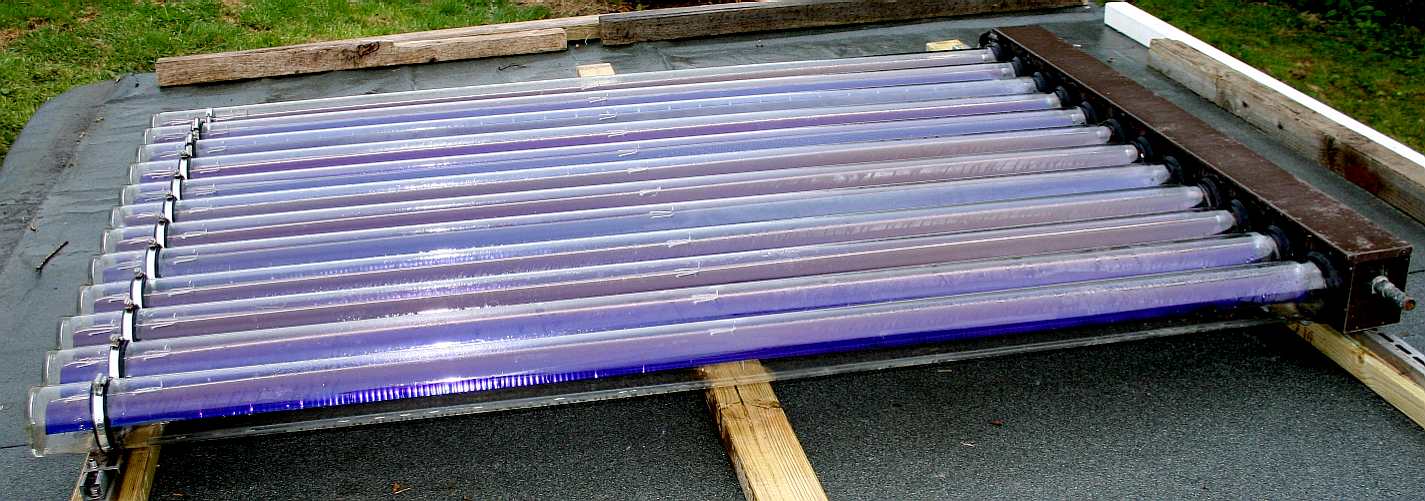
ROOF MOUNTING - Here are the same vacuum tubes, now (28-3-16) mounted on the roof of a convenient outbuilding and ready to start supplying heated water to our underground storage tank. Yes, their is a large domed water tank, that just needs lining. The accumulated heat mass can then be used to heat our test tank, or the SeaVax Laboratory as and when needed. A wind turbine mounted on the end of the lab, will generate electricity for our experiments. This is truly a solar powered research facility. Things were blown about a bit on site from Storm Katie, but there was no damage, save to some fencing that was quite old.
FROSTY MORNING - And once again, the same tubes the following morning. You can see the sun coming up over the adjacent fields, but that the tubes are covered in frost. This highlights the importance of a large heat store (sink). We have a large underground tank that is to be used for this purpose. Until the sun rises, all solar operated equipment is simply on standby.
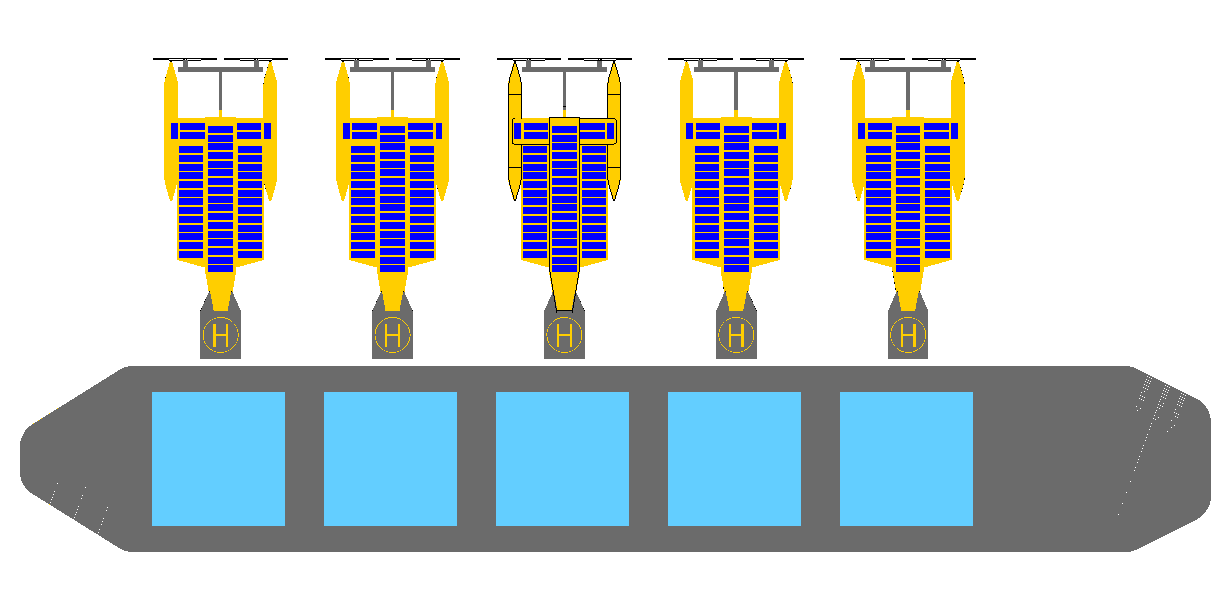
OCEAN TRANSFER - In this diagram we see a 180 x 28 meter Handysize bulk carrier (drawn to scale), and five SeaVax ships docking to unload their plastic haul. If one Handymax can handle around 50,000 tons of plastic waste, it would then take 66 SeaVax transfers (in multiples of five as shown) @ 750 tons each, to fill up one cargo ship. A Handymax would cruise between SeaVax fleets, emptying them in sequence, or as requested by the SeaVax vessels themselves - to make a virtual conveyor belt to land. Our testing tank will not be big enough for five SeaVax ships, nor a proportional model of a PlastiMax. We will be using a half size model ship to keep the exercise containable and just one SeaVax boat. The test tank has to be deep enough to allow the bulk carrier to sink to its maximum displacement line.
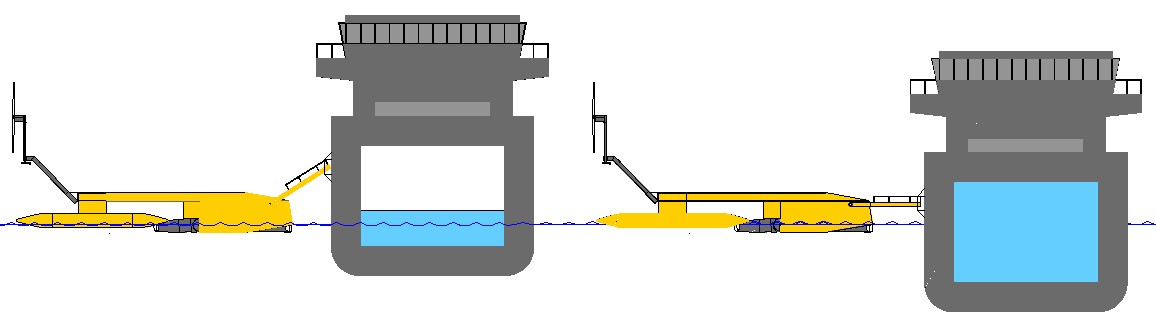
DOCKING PROCEDURE - The docking couplings and method of transfer are not shown or explained here in any detail for legal reasons. Having said that, we can show you the basic principles. The SeaVax and PlastiMax (a converted bulk carrier) on the left are shown together with the hold of the bulk carrier about one third full with the PlastiMax floating high in the water. As the cargo hold fills up with plastic the ship displaces more water and sinks deeper into the seawater. A special coupling and transfer technique is needed to make this work. The same system will work just as effectively when SeaVax is transferring its cargo in harbours, ports and rivers. Read more on this by clicking on the picture.
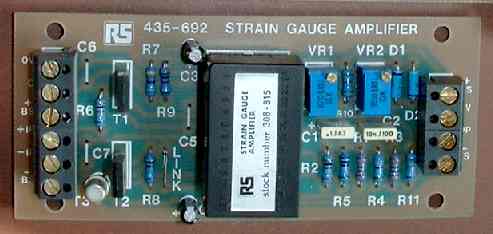
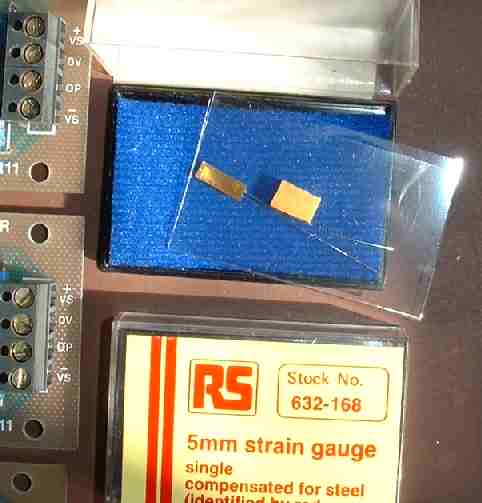
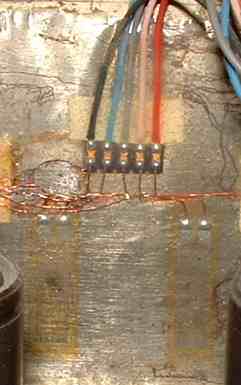
STRAIN GAUGES - A strain gauge (SG) is a device used to measure strain on an object. They are particularly suitable for model hull tank testing as part of an overhead mounting. The most common SG was invented by Edward E. Simmons and Arthur C. Ruge in 1938. This consists of a metal foil in a grid pattern, bonded to a flexible plastic film (polyimide insulator) that reinforces and insulates the foil from the item being measured. Typically, SGs are laser cut for accuracy. You can see a diagram above and a picture of the actual item as supplied by Radio Spares (RS). RS also do a neat amplifier that multiplies a signal (gain) x 1,000. The above assembly costs in the region of £60. You will need an amplifier and PCB + all the resistors and capacitors to assemble the above board, one for each movement to be measured.
The gauges (in multiples of four) are attached to the object to be monitored by a suitable adhesive, such as cyanoacrylate and the whole installation coated in epoxy resin. When an electrical wire (conductor) is stretched the decrease in diameter increases electrical resistance, measured in ohms. Conversely, if compressed, the increase in diameter decreases resistance. To increase the effective length of wire being stretched or compressed, a zig-zag pattern of parallel lines is used, producing a larger measurable change in resistance than would be observed with a single straight-line conductive wire - that would in any case be impractical.
SLUICE GATE
A gate that we can lift, that is also see-through, might be an advantage. To fill our testing tank the sluice gate is slotted in place and a rubber sealing ring is inflated. The tank is then filled with water from an onsite water supply. To empty the tank, we will lift the right had sluice gate a small amount, when the water will empty on the other side into a storm drain. We do not need particularly deep water for our tests, reducing the water used, some of which comes from a rainwater collection system nearby.
Our sluice gate is constructed of a treated wooden frame with a thick sheet of structural plywood as the barrier. We are looking at incorporating a glass portal in one of the gates as some time in the future.
SLUICE GATE - Here you can see our sluice gate under construction. We've used treated 4" x 2" timbers to make a sturdy frame that is held together with 6" steel pins. April 14 2016. Read more about this by clicking on the picture above.
OVERHEAD VIEWING - To be able to see and so understand what is happening to SeaVax in simulated sea-storm conditions and high winds from above, this bridge has been installed as a convenient observation platform for scientists - and a popular viewing point for visitors. Copyright © January 3 2017, all rights reserved. You will need permission from Bluebird Marine Systems Ltd to reproduce this photograph except for private research and educational use.
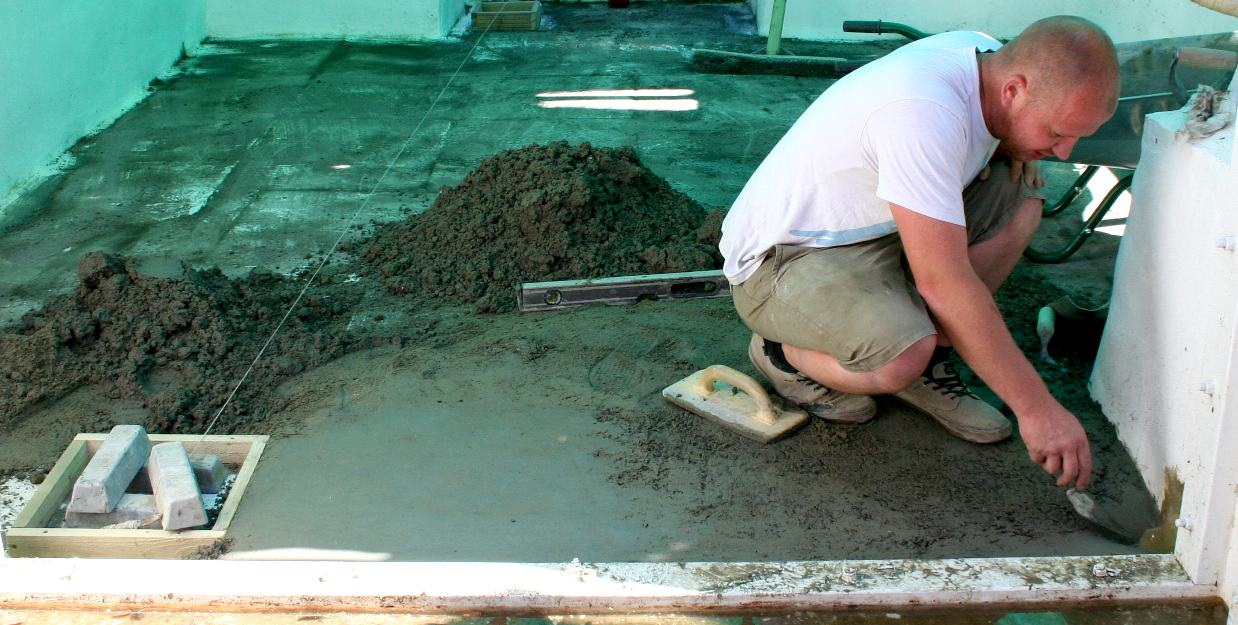
CURING THE LEAKS - After several test sessions that did not quite go according to plan, the Cleaner Ocean Foundation bit the bullet and screeded the test tank floor with a sharp sand and cement mix. Copyright © May 26 2017, all rights reserved. You will need permission from Bluebird Marine Systems Ltd to reproduce this photograph except for private research and educational use.
LINKS & REFERENCE
https://avaaz.org/ https://www.uni-due.de/IST/ismt_circulation_tank.shtml http://www.edesign.co.uk/portfolio/plymouth/ https://www.plymouth.ac.uk/research/institutes/marine-institute/coast-laboratory https://www.rivallab.com/facilities/ http://www.npl.co.uk/about/history/research/ship-tanks/ http://www.umd.edu/ http://www.building.co.uk/making-waves-plymouth-marine-laboratory/5069697.article info@marin.nl http://www.marin.nl/ https://en.wikipedia.org/wiki/Maritime_Research_Institute_Netherlands https://www.coanda.ca/services/equipment/tow-tank/ http://www.designindaba.com/articles/creative-work/award-winning-ocean-cleanup-team-launch-their-first-open-water-test http://www.bbc.co.uk/news/uk-england-35909651 http://stamco.co.uk/
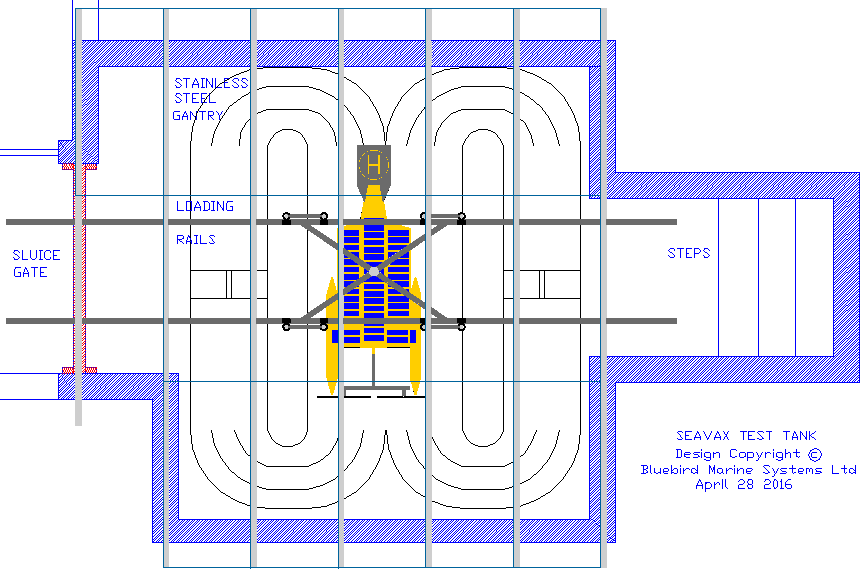
PLAN VIEW - In this diagram we are looking through the glass roof into the the SeaVax test tank from above. We can see the overhead gantry, carriage and rails positioned so that the model is central in a (dual) converging continuously re-circulating flow of water.
BRICKS
& MORTAR - CARRIAGE
- DRAINAGE
- FACILITIES
- FILTRATION
- GLASS
& PAINT - GANTRY -
GIMBALS
- HATCHES
- HYDRODYNAMICS
HISTORY
-
INSTRUMENTS - LABORATORY -
LAMINATING
- LOGISTICS
- OUR
TEST TANK - PROOFING
-
REVIEWS - SCREEDING
- SEAVAX TEST VIDEOS
- SLUICE
GATE - SOLAR
BATTERIES - WAVE MAKING -
WIND MACHINE
|
|||||||||
|
This page is Copyright © 2018 Bluebird Marine Systems Ltd. The names AmphiMax™, Bluebird™, Bluefish™, Miss Ocean™, RiverVax™, SeaNet, SeaVax™, and the blue bird & fish in flight logos are trademarks. All other trademarks are hereby acknowledged.
|