|
GIANT SOLDIER ANT - ANIMATRONIC BODYWORK
ANTICS - ARDUINO - ARMOUR - ARTWORK - BIOLOGY - BLACK BOX - COMPUTERS - ELECTRONICS - ENERGY - FRAME - FORMICARIUM HEAD - JAWS - JIMMY WATSON - KITS - LEGS - MECHANICS - MOTORS - MOVIE - PHOTOGRAPHY - RASPBERRY Pi R/C DRONE - ROBOTICS SENTRY - SOFTWARE - SOUND PROOFING - SPACE ROVERS - SPEED - SUSPENSION - TAIL - UKRAINE DRONES - WEAPONS - WARGAMING
|
|
|
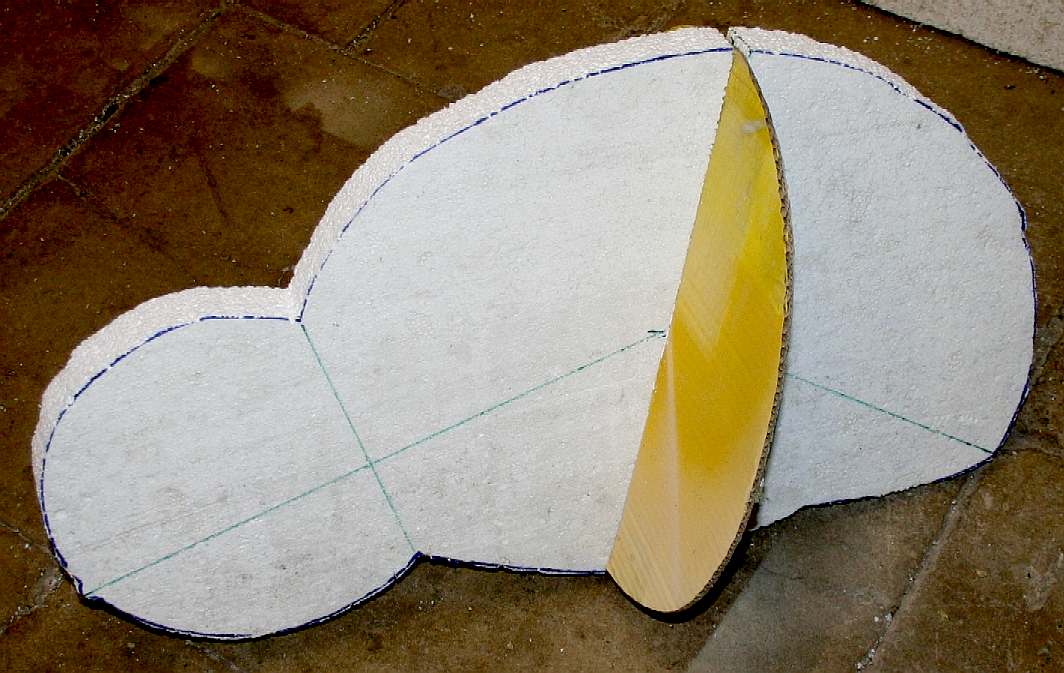
TAILS - A "how-to" sequence that shows you the stages in making a master pattern for a large scale body part. Looking pretty harmless at this stage, the tail of the creature is cut out in two planes in expanded polystyrene foam and cardboard - and slotted together. Three more sections will be slotted into place before filling in with more foam, ready for final shaping. Be sure to mark out accurately and leave extra foam. It's better to have a little more than needed, than a little less. Please note that these photographs are copyright © Jameson Hunter Ltd 2015. You will need permission from Jameson Hunter to be able to reproduce it.
ANATOMICALLY ACCURATE BODYWORK & ARMOUR
This page will show you how to make very accurate bodywork for a giant robotic display, or an extremely strong (bullet proof) outer shell for animatronic wargaming.
The television series Robot Wars was broadcast in the USA and UK, but has now stopped running. Yet, robotics is increasing in popularity all over the world. Japan seems to be leading the charge with humanoid toys popping up all over the place as significant exports.
The giant insect platform being developed as animatronic display platforms, may be just as useful as an educational tool that sparks the imagination in the next generation of robotic engineers. In this sequence of photographs we show you how to make large body parts using very inexpensive everyday materials such as cardboard and polystyrene foam.
The cardboard we salvage from old boxes that we flatpack and store, and the polystyrene comes from a builders merchants and the adhesive we buy from our local paint stockist (trade). Other suppliers that are useful are ToolStation and ScrewFix.
TAIL BUILD - Two more cardboard sections are added and a foam central section. These are bonded in place with a proprietary building adhesive - that does not melt polystyrene. Use off-cuts as in-fills to close gaps. The abdomen is basically two spheres, one large and one smaller, but they are not regular shapes. Please note that this photograph is copyright © Jameson Hunter Ltd 2015. You will need permission from Jameson Hunter to be able to reproduce it.
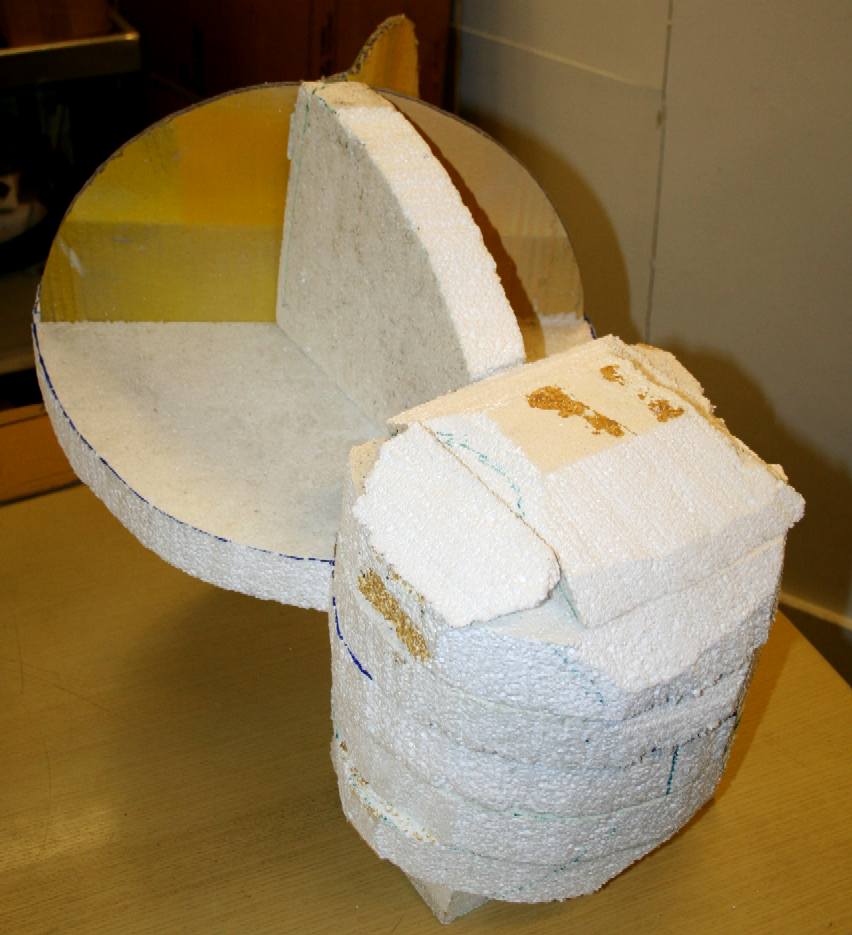
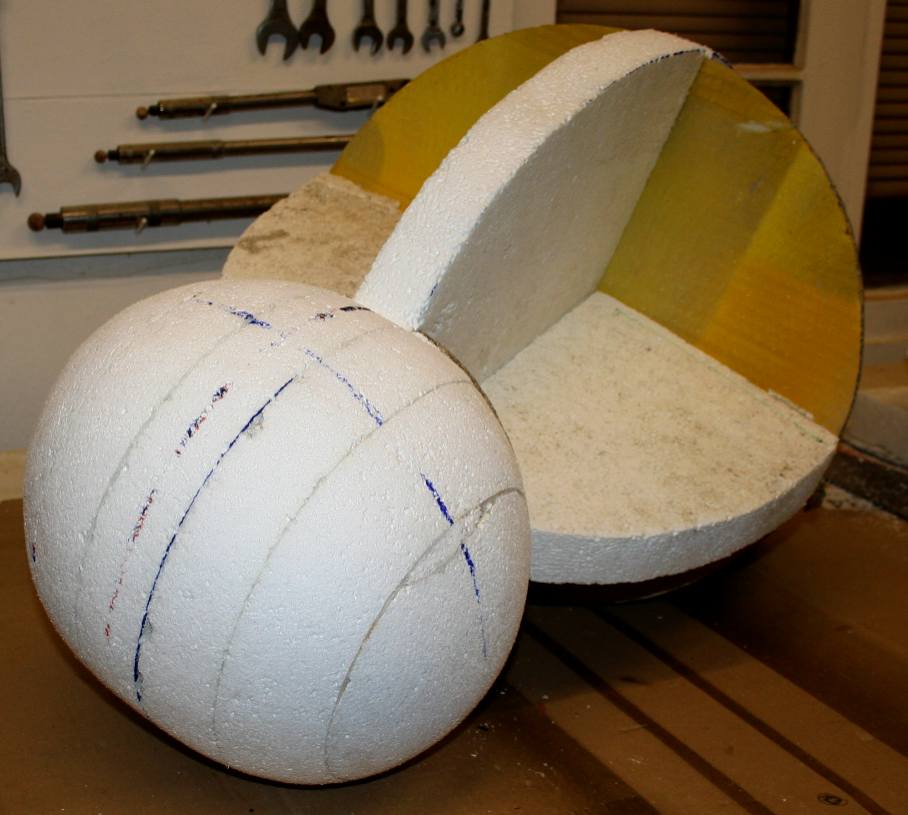
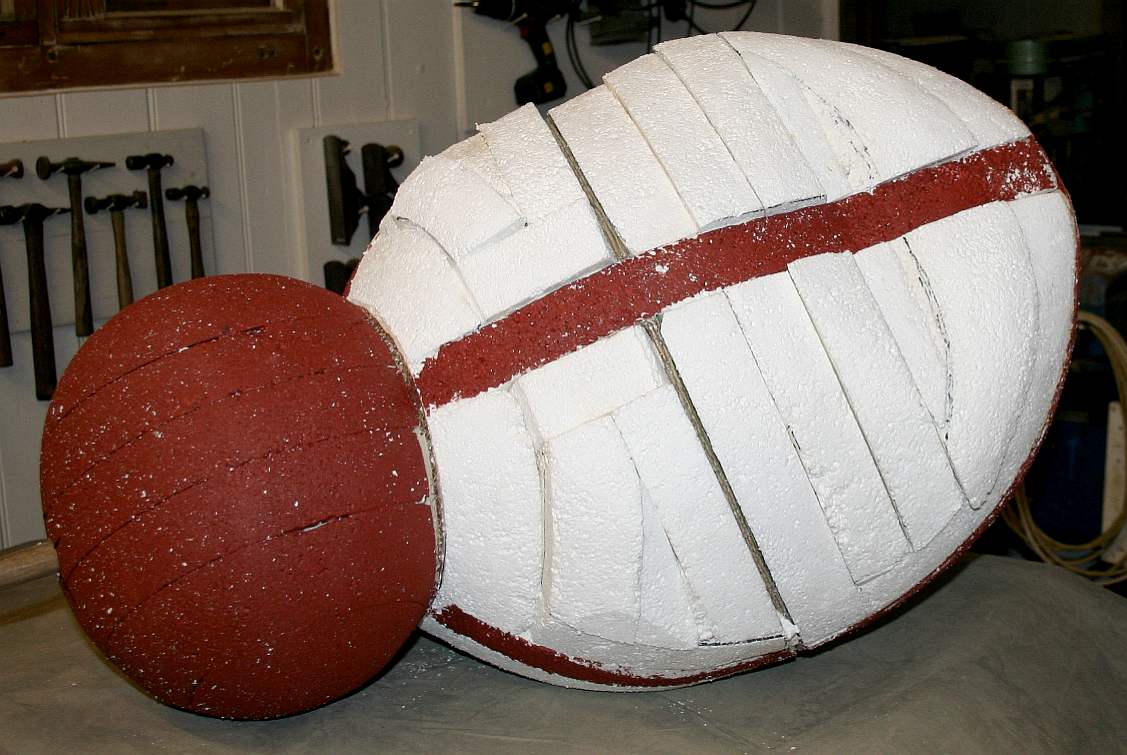
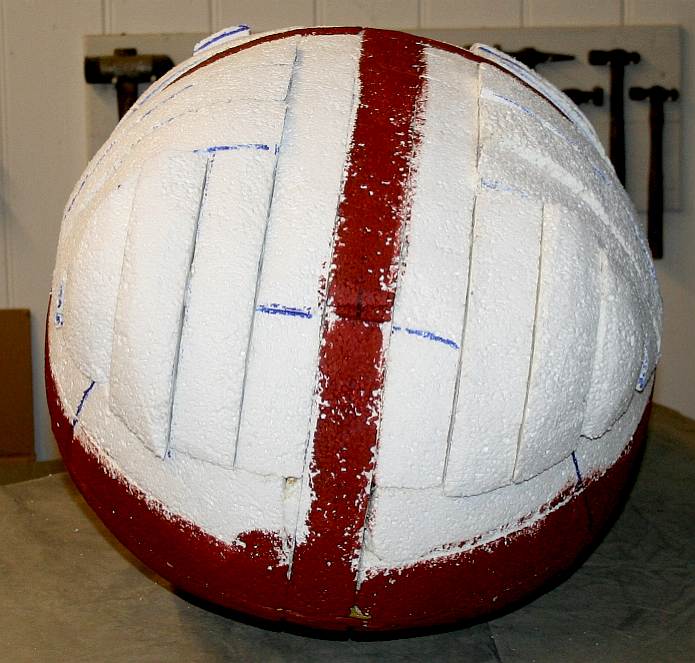
TAIL TO BODY - The smaller sphere is built up with six more sheets on either side of the central former. This can be time consuming, but have patience. The sheets are bonded together to form a block. In days gone by timber was joined together to carve figureheads for ships in more or less the same way. We find it best to glue a few sections then allow those to dry, before adding anymore in-fill. you should not attempt to shape until the whole assembly is filled in and dry. Please note that this photograph is copyright © Jameson Hunter Ltd 2015. You will need permission from Jameson Hunter to be able to reproduce it.
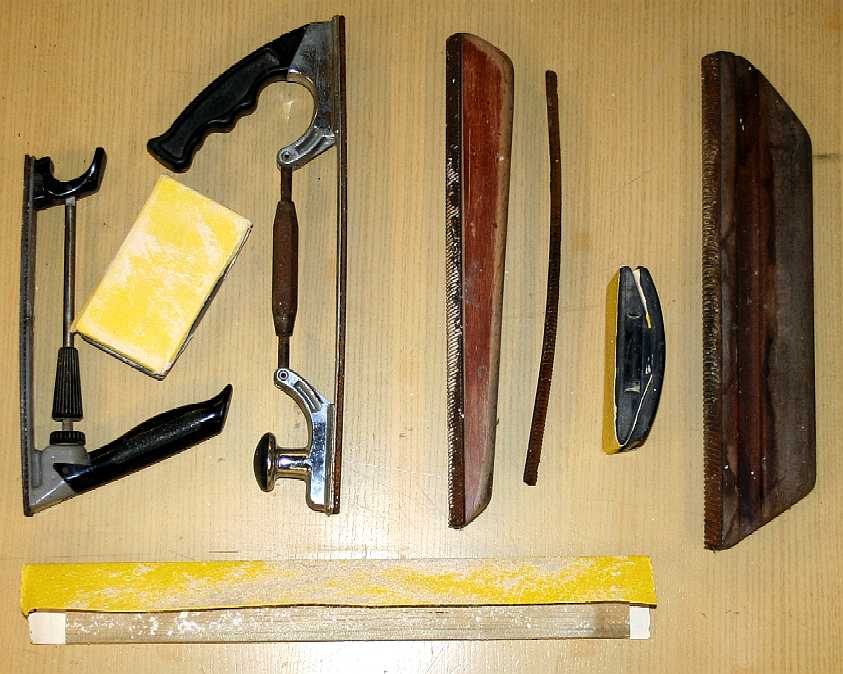
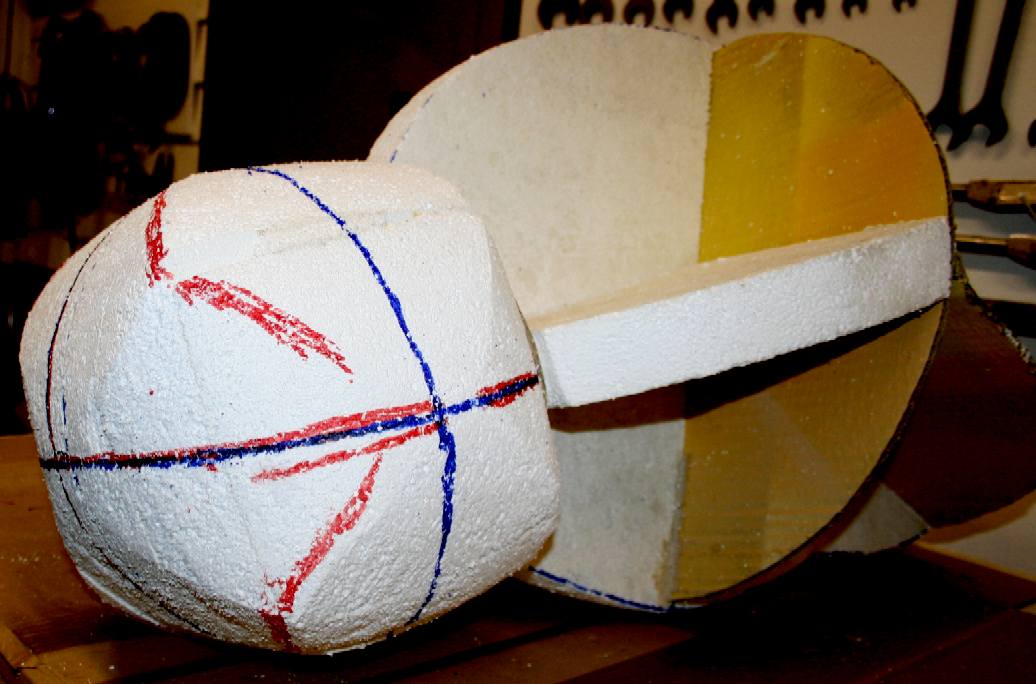
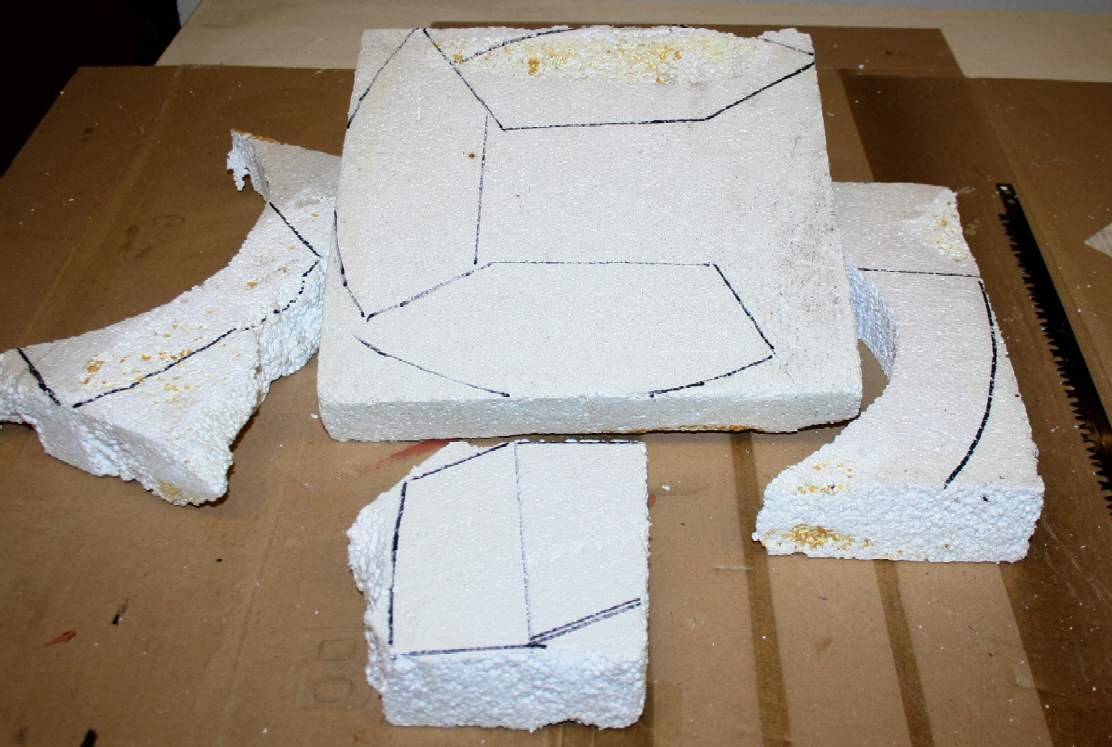
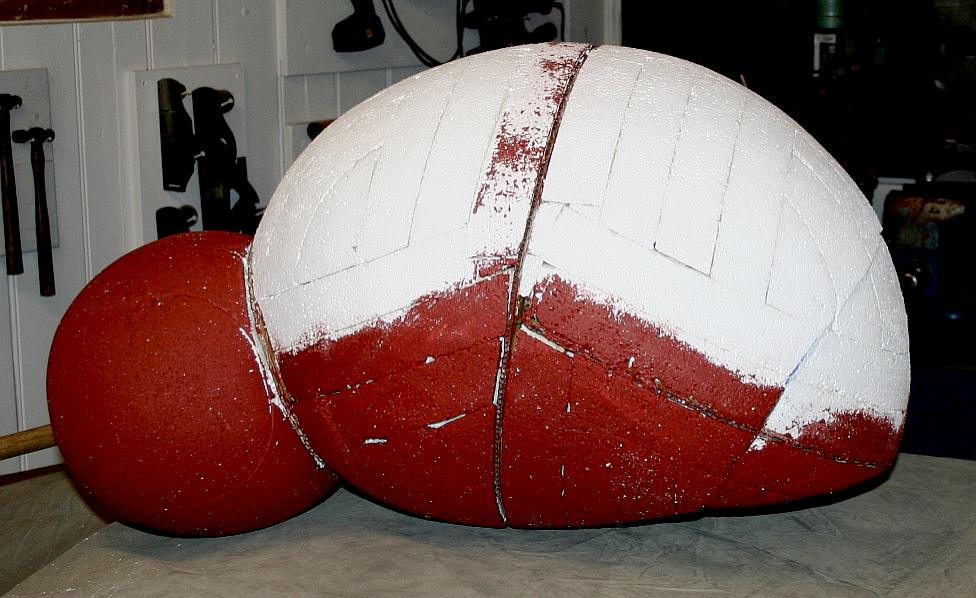
TAIL SHAPING STAGES 1&2 - [LEFT] From the rough tail node sandwich we must regularize the irregular by making flat the sphere in four planes. [RIGHT] Repeat the regularizing process, adding another four flat planes, making eight flats rings from the rough block. Note the different colors used as a guide. The artist used a garden saw blade and a rough rasp for these shaping sessions. The foam is quick to work, so be careful. Please note that these photographs are copyright © Jameson Hunter Ltd 2015. You will need permission from Jameson Hunter to be able to reproduce it.
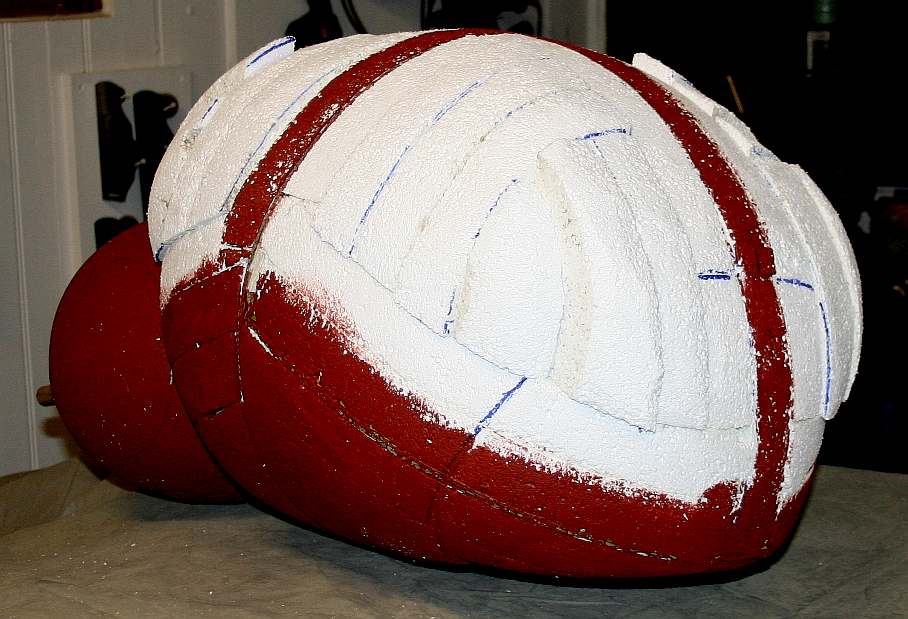
TAIL SHAPING STAGE 3 - Being sure to lay down plenty of guide ink in different colors after each shaping stage. Never lose the four main guide rings, here shown in blue and red. We now lose the angular edges in between the guidelines completely. It is not safe to advance to this stage unless it is clear that there is sufficient foam to allow final shaping, and that the guide lines are intact. Because, if you lose your guide lines, you'll just be guessing as to the shape - and this animatronic is anatomically correct. Most museum and fun fair displays are not. Please note that this photograph is copyright © Jameson Hunter Ltd 2015. You will need permission from Jameson Hunter to be able to reproduce it.
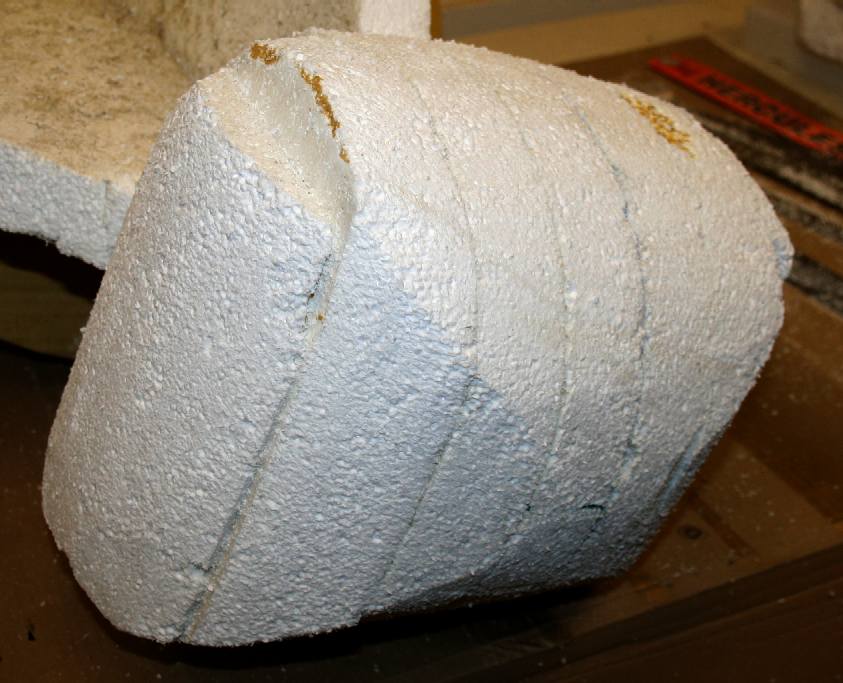
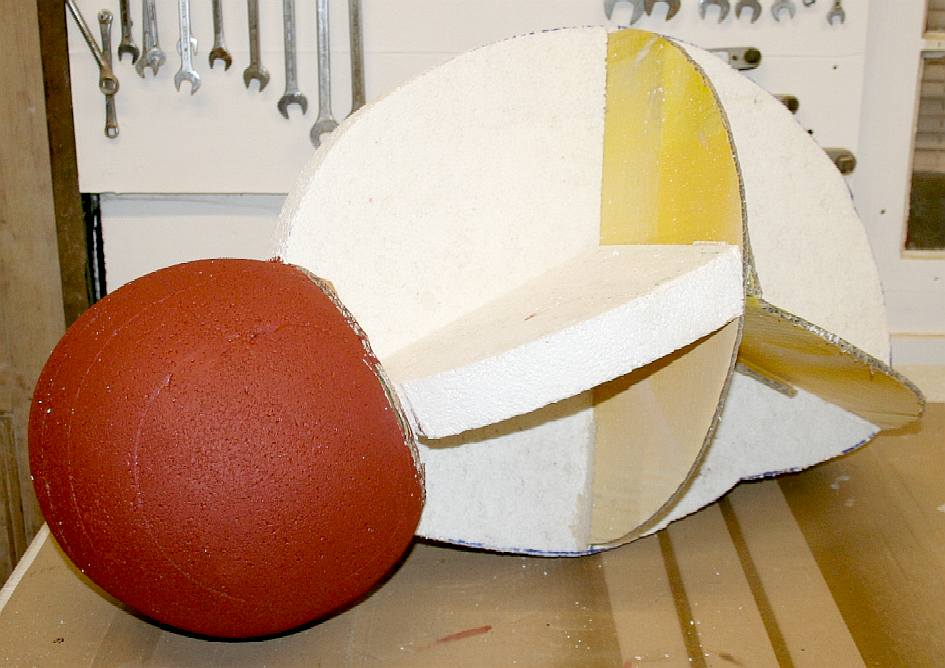
TAIL SHAPING STAGE 4 - Okay, the sphere is sound with no huge sections to infill and the shape is looking good, so we can sand with 40 grit to give us this part of the tail complete. Please note that this photograph is copyright © Jameson Hunter Ltd 2015. You will need permission from Jameson Hunter to be able to reproduce it.
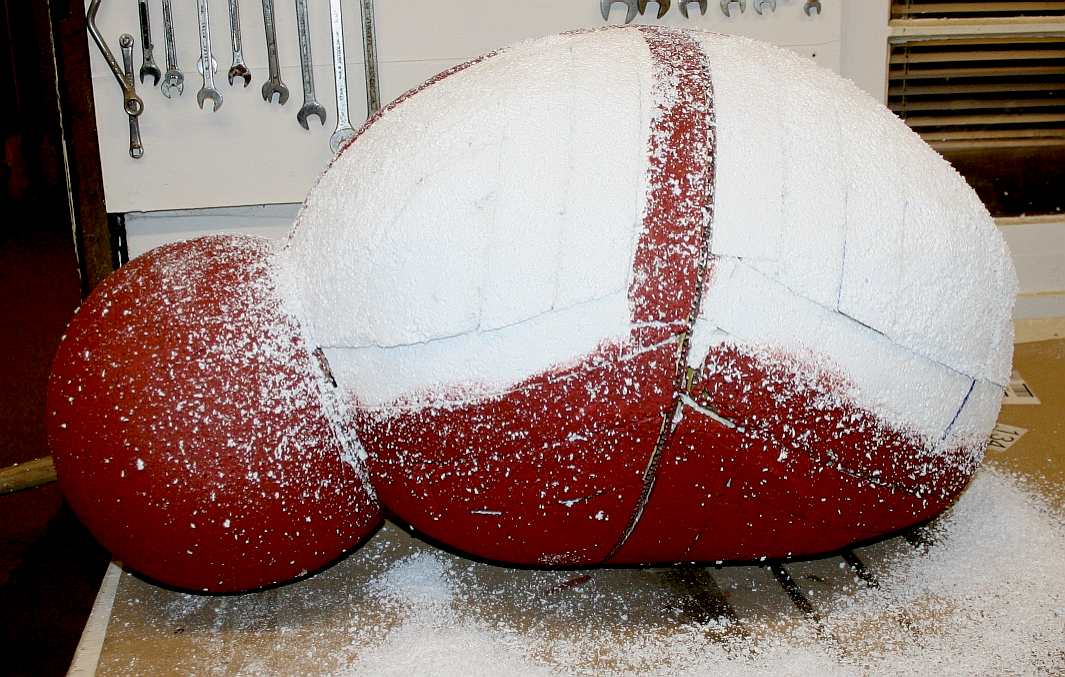
TAIL SHAPING 5, SEALING - Never leave foam artwork unprotected. The artist seals sections that are at this stage, with a good quality vinyl emulsion. The result is that the surface hardens, becoming resistant to scuffs and rough handling - as when dealing with the next section. Do not be in a hurry. The more carefully you proceed, the quicker the job will progress. Rushing is a recipe for disaster and more work correcting mistakes. The next stage is to fine surface fill - but not until the large abdomen section is filled, shaped, and sealed. Please note that this photograph is copyright © Jameson Hunter Ltd 2015. You will need permission from Jameson Hunter to be able to reproduce it.
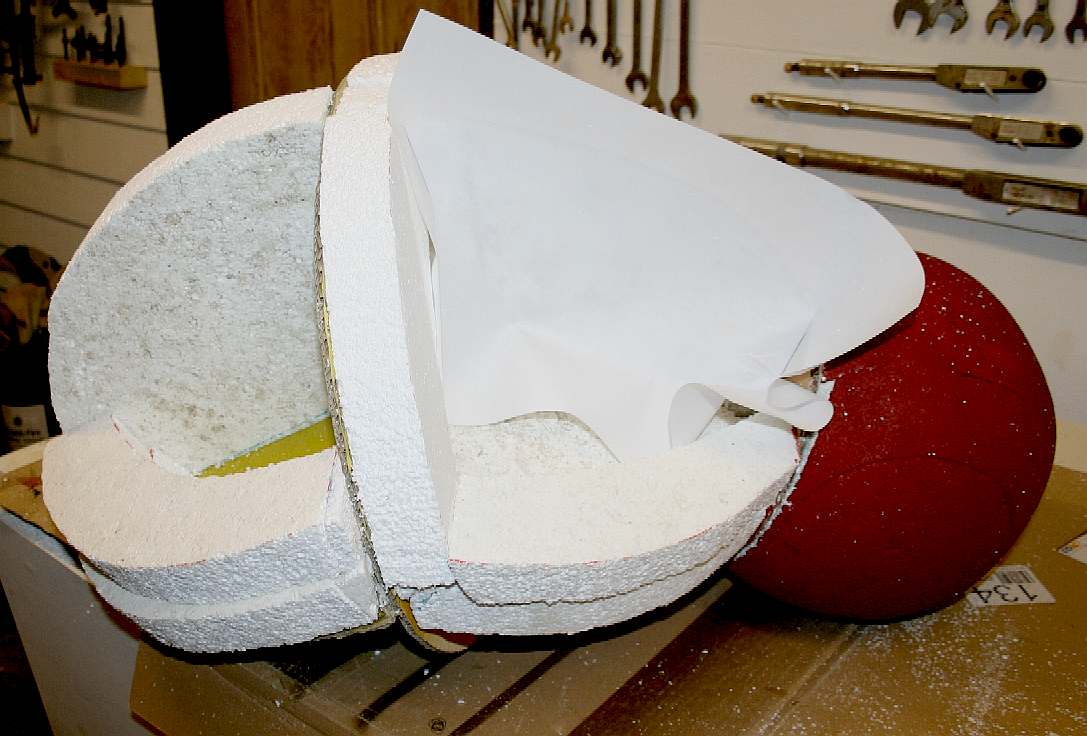
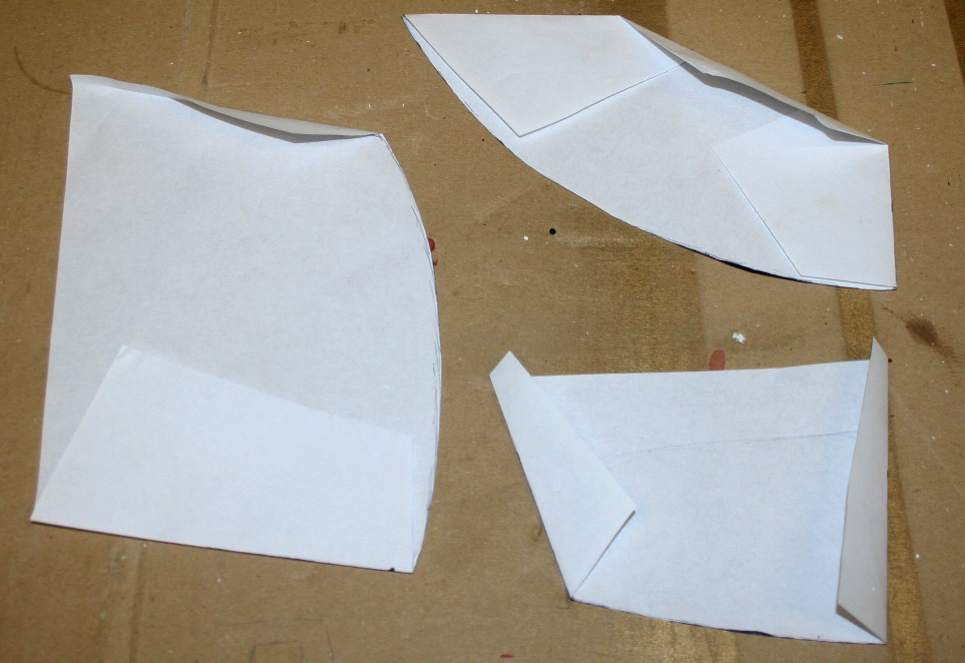
TAIL SHAPING STAGE 6 - Using paper to create quick templates for those tricky angles. Put is a thin sheet of paper and crease into the corners, then mark with a pencil of pen and cut or fold to size. You can then mark out the foam sheeting using a lot less than guessing, and a lot less effort than producing a whole raft of Autocad drawings. The object here is to fill in the spaces in between formers so that we use as little foam sheet as possible and keep the mass down - while the strength of the artwork is good. Please note that this photograph is copyright © Jameson Hunter Ltd 2015. You will need permission from Jameson Hunter to be able to reproduce it.
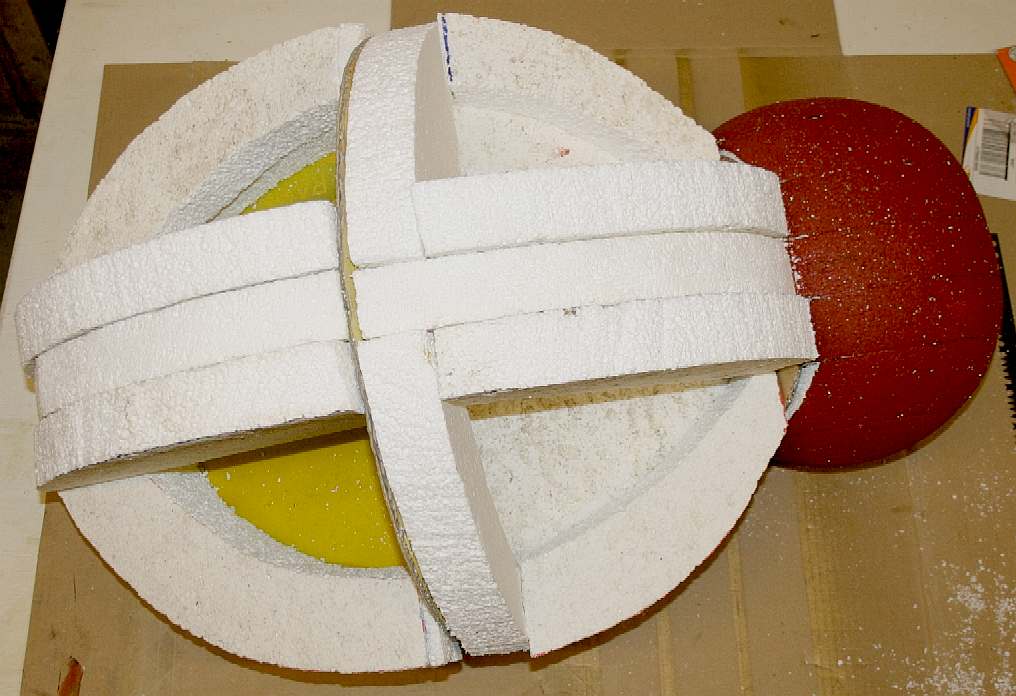
TAIL SHAPING, STAGE 7 - More sections are cut, fettled so that they fit nicely and then bonded in place. This is a view from above. Please note that this photograph is copyright © Jameson Hunter Ltd 2015. You will need permission from Jameson Hunter to be able to reproduce it.
TAIL SHAPING STAGE 7 - Still at stage 7, this is a view from behind, and it looks like the abdomen of an insect already. Please note that this photograph is copyright © Jameson Hunter Ltd 2015. You will need permission from Jameson Hunter to be able to reproduce it.
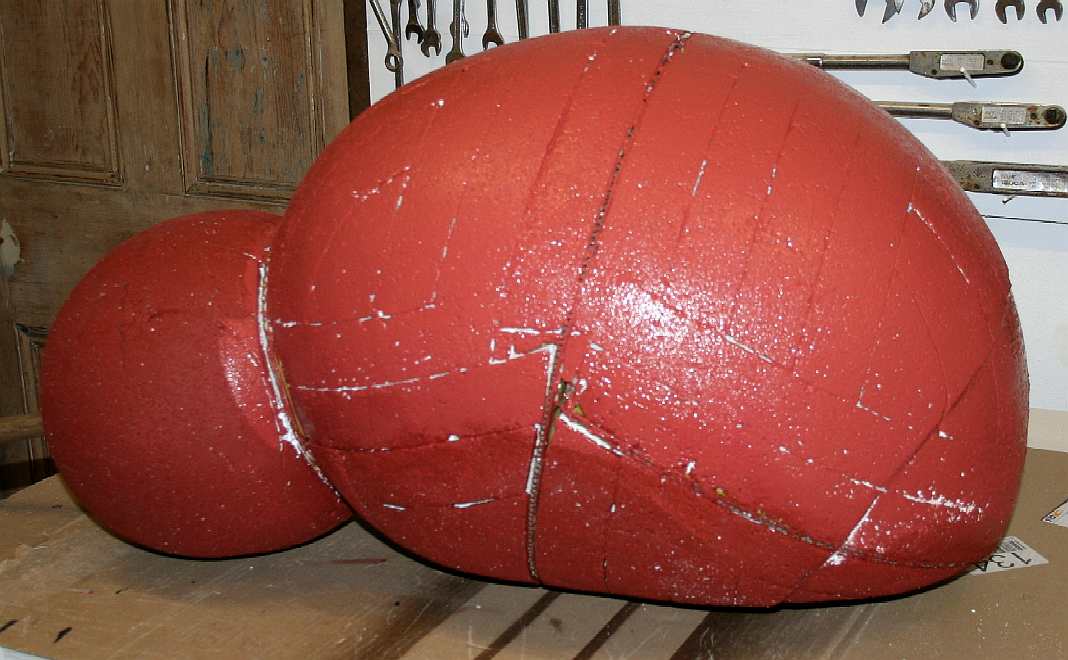
TAIL SHAPING STAGE 7 - Still at stage 7, this time reinforcing the foam outline with paint - ready for another round of infill. Please note that this photograph is copyright © Jameson Hunter Ltd 2015. You will need permission from Jameson Hunter to be able to reproduce it.
TAIL SHAPING STAGE 7 - December 6 2015, still at stage 7, infilling the underside of the tail section is a long job because of drying time in between sheet bonding. Don't rush it. Patience is a virtue that you can acquire with experience. We've used almost a whole sheet of 8' x 4' x 1 3/4" foam to get to this stage - and that was being frugal - using off-cuts from another project. It takes a lot longer to make an anatomically correct model, than most of those commercially available for fun parks, etc. This photograph is copyright © Jameson Hunter Ltd 2015. You will need permission from Jameson Hunter to be able to reproduce it.
TAIL SHAPING STAGE 7 - Cut those infill sections as accurately as possible, including the angled ends, for a snug fit. If this proves too difficult, simply bond in a wedge. The picture above shows some nicely fitting foam and some where a wedge was a practical compromise. Please note that this photograph is copyright © Jameson Hunter Ltd 2015. You will need permission from Jameson Hunter to be able to reproduce it.
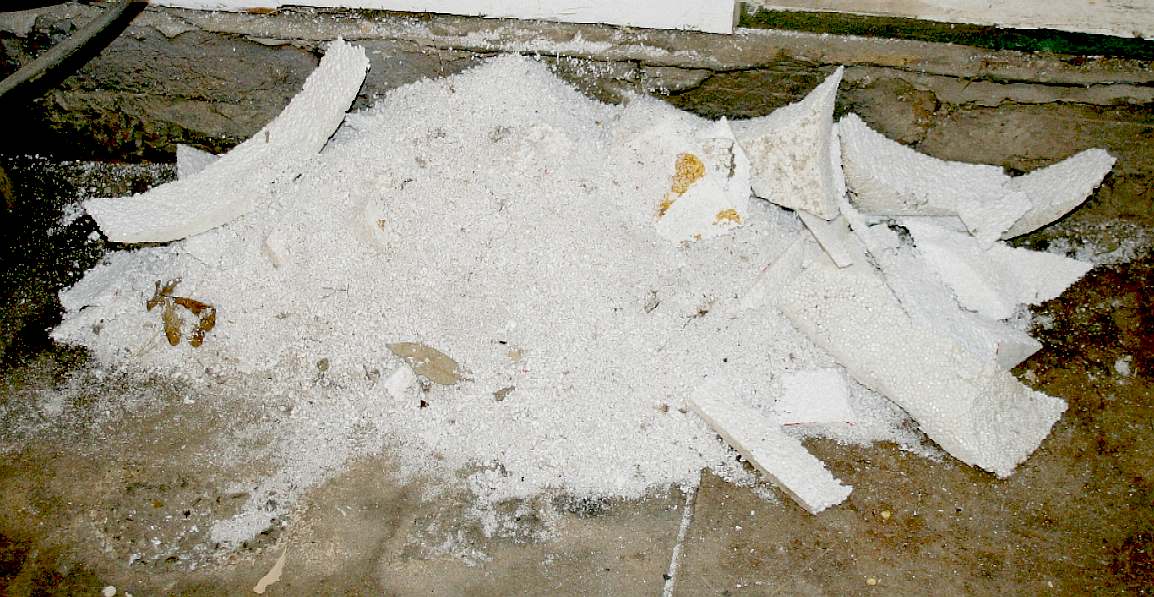
WASTE RECYCLING - You will end up with a giant sack of foam off cuts and Styrofoam beads. Some of the off cuts are useful for your next project, the beads we use for ocean cleaning experiments. You don't want any of this ending up in the ocean, so dispose of thoughtfully. Think of the poor fishes, dolphins, seals and whales.
PAPER TEMPLATES - If you want to speed up the foam fill, make paper templates. It seems like a lot of bother, but in fact they take seconds to mark and cut out with scissors and will save much more time when you cut a bit of foam and it does not fit. a) You will create more waste from foul-ups. b) You will have to make that slice again. Yup, you will end up doing more than twice the work if you don't take a few seconds to cut out a few bits of paper.
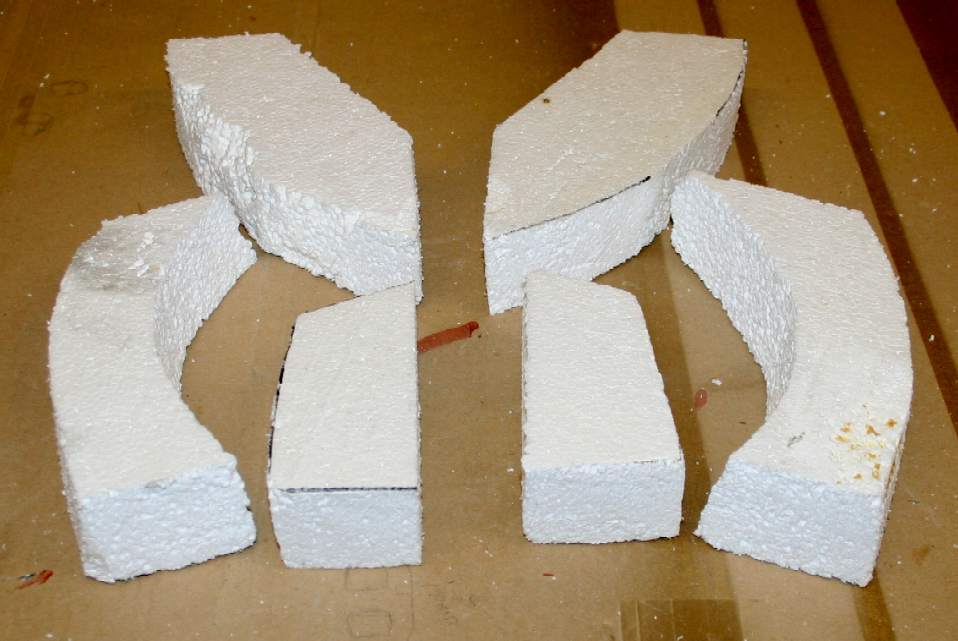
CUTTING THE BLANKS - Using the paper templates mark out the blanks (handed, left and right) and cut them out leaving about 3mm extra for bedding in. Making these six pieces using the paper template method took less than 10 minutes. Imagine how long that might take using trial and error. There are around 26 slices on the underside and about the same for the topside. There were 7 for the spherical section. That is 59 pieces of polystyrene to cut. At 10 mins for 6, that works out at 98 minutes to cut and rough shape the blank slices. Bonding takes about 10 seconds a slice, so add another 10 minutes. Shaping takes about 20 mins for a large section, so add another hour - to give around 3 hours of actual work time. In reality, we are looking at a whole day to make the master, to include surface filling. Then comes the mould for the GRP or Kevlar. You have to repeat this for every body part. The time clocked soon mounts up and that is why these robot projects are so expensive.
TAIL SHAPING STAGE 8 - Once filled, you artwork should look something like this. Allow the adhesive to set before getting stuck in with a rasp. The temptation is to rush in, but if you do before there is a bond, the styrene slices will move and spoil your efforts. Please note that this photograph is copyright © Jameson Hunter Ltd 2015. You will need permission from Jameson Hunter to be able to reproduce it.
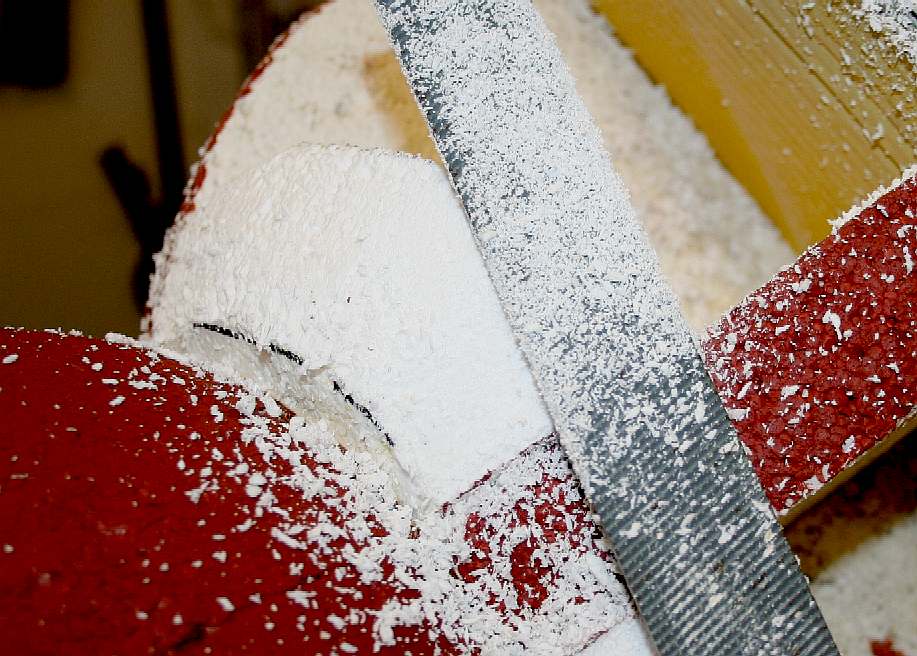
TAIL SHAPING STAGE 8 - [left] You might want to roughly shape the previously bonded section to make fitting the new slices easier. [Right] having bonded in the new sections, use a rough (bastard cut) rasp to hack down and then use the fine file to shape. Do not push hard, let the blade do the cutting. Each blade has its own cutting speed depending on the number of teeth and the depth of the channel. Taking control of the waste beads is essential - or you will get into a right mess. Dust the bench off between each shaping session using a soft bristle brush and sweep the floor where you are standing. Please note that this photograph is copyright © Jameson Hunter Ltd 2015. You will need permission from Jameson Hunter to be able to reproduce it.
TAIL SHAPING STAGE 8 - Once shaped, you can sand with 40 grit to take down any high points before applying a coat of paint to seal the surface. Please note that this photograph is copyright © Jameson Hunter Ltd 2015. You will need permission from Jameson Hunter to be able to reproduce it.
TAIL SHAPING STAGE 8 - Apply a full coat of paint to get into the cracks and then brush out to remove the excess. That is the underside foam filled. We'll need to dress this later to get rid of the seams. Please note that this photograph is copyright © Jameson Hunter Ltd 2015. You will need permission from Jameson Hunter to be able to reproduce it.
TAIL SHAPING STAGE 8 - Spin her over and cut out another 22 sections (not all at once) and bond into place. See here a sheet of styrene foam marked out with the next inserts to be cut. The sequence is mark out, cut, shape and bond - mark out, cut, shape and bond. Please note that this photograph is copyright © Jameson Hunter Ltd 2015. You will need permission from Jameson Hunter to be able to reproduce it.
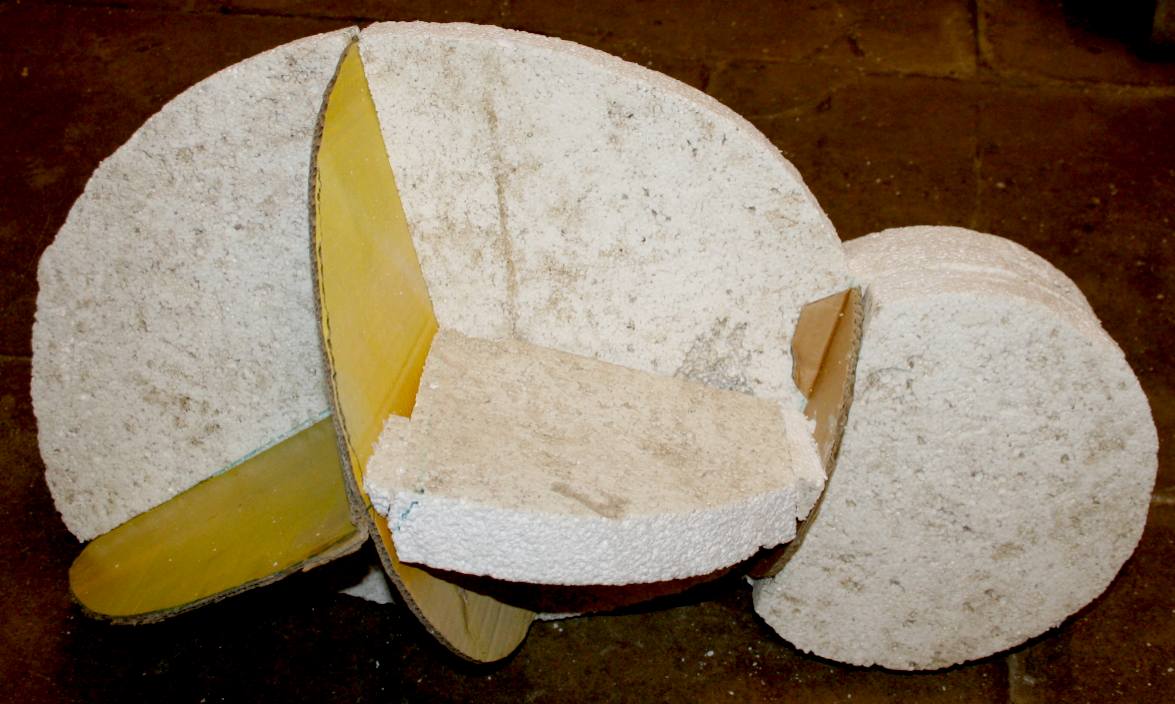
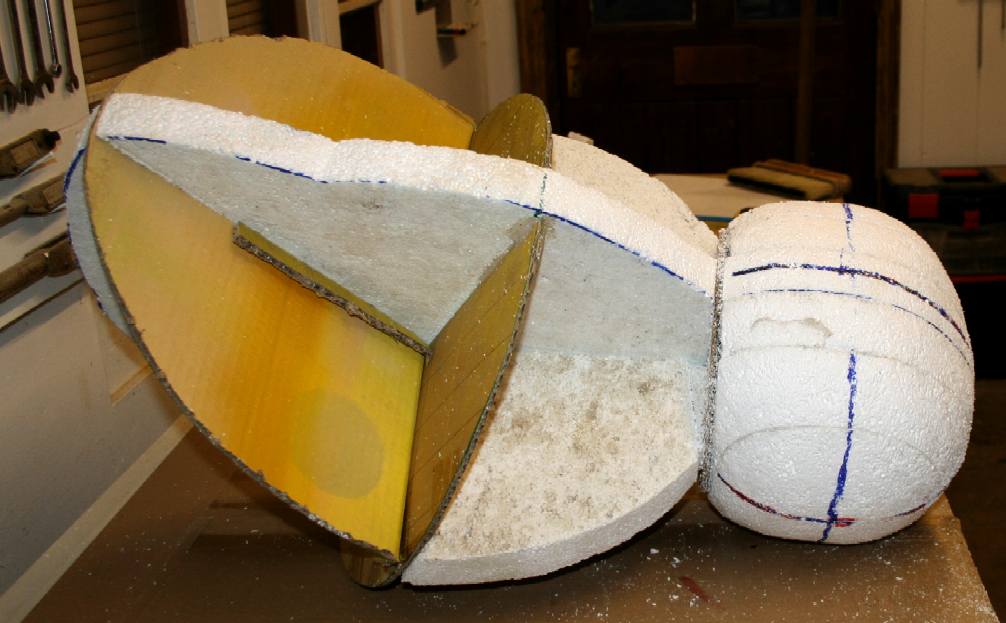
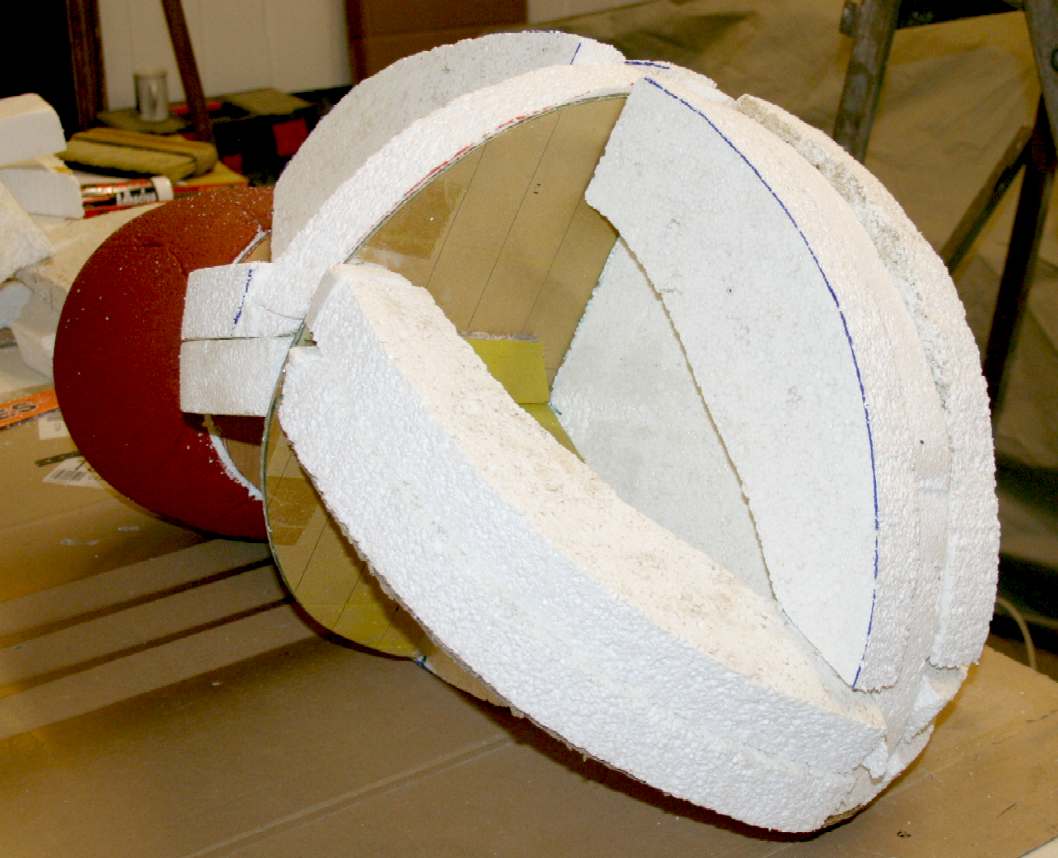
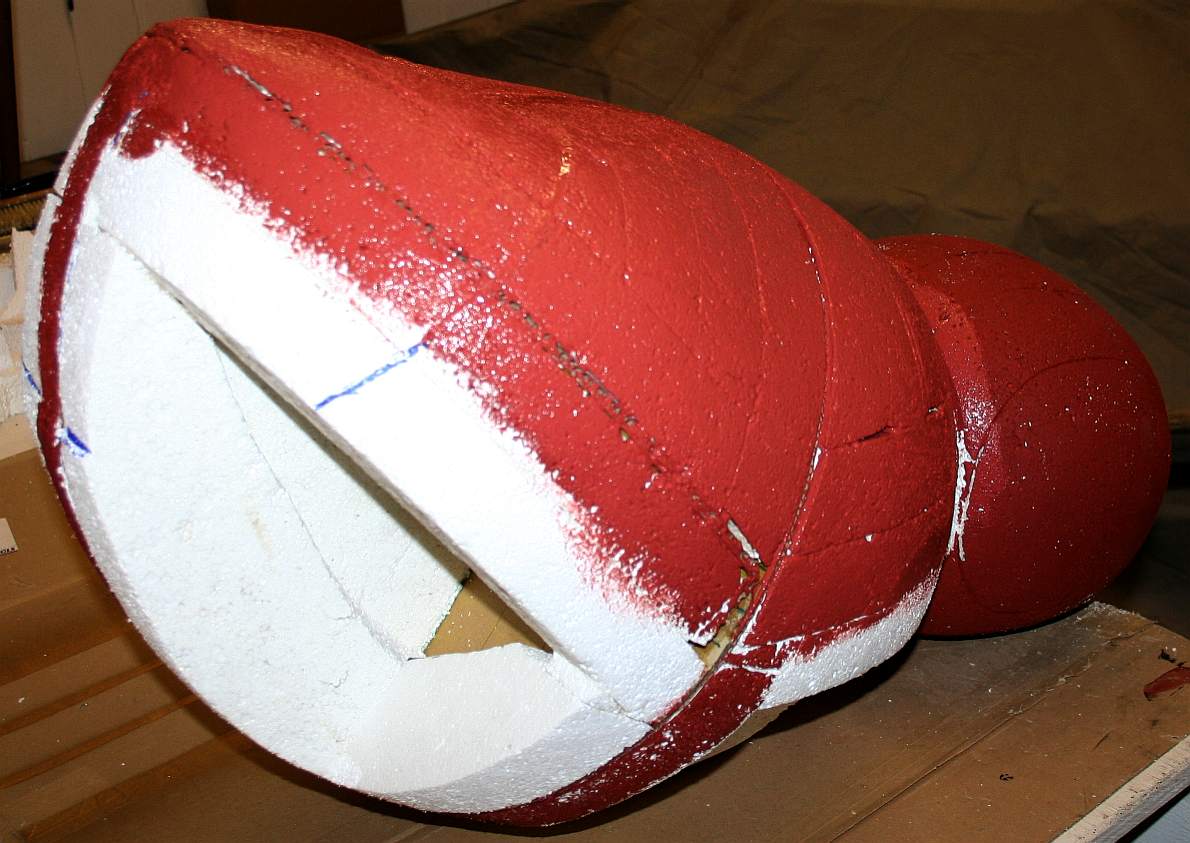
TAIL SHAPING STAGE 8 - [LEFT] It is clear from this shot that there is a significant hollow inside the tail of this giant insect. The air space represents saved material. It would not have been possible to make this master from a single sheet of foam, if buck had been built up as a solid block. [RIGHT] The same angle showing the rear of the tail section filled in. Provided that you bond the sections together well, this will be strong enough to act as a 'male' master for the 'female' (split) moulds to be made. Please note that these photographs are copyright © Jameson Hunter Ltd 2015. You will need permission from Jameson Hunter to be able to reproduce it.
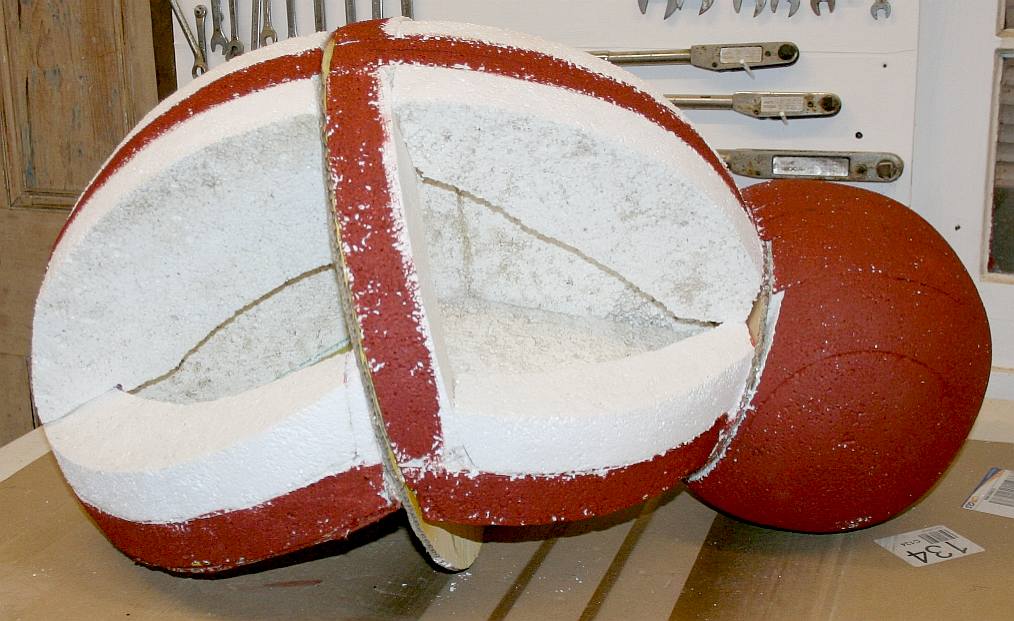
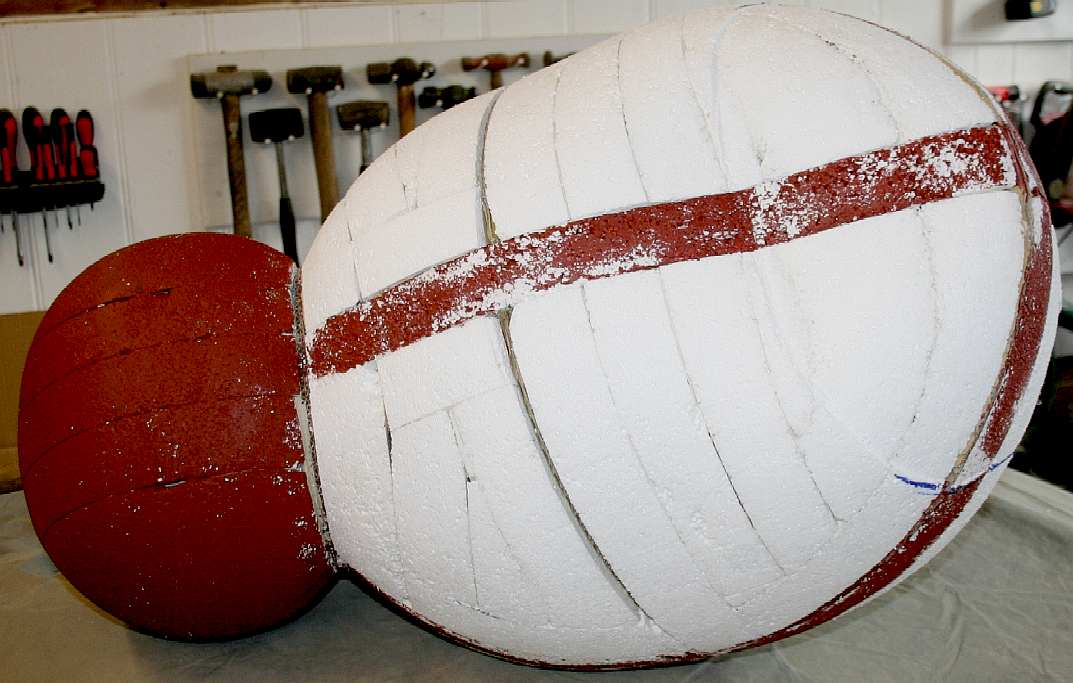
TAIL SHAPING STAGE 8 - Another view of the abdomen. The shape is coming through loud and clear. The rough fill will now be shaped as with the underside, and sealed. Then the detailing can begin. Of particular importance is the sting (not shown). Ant stings can be so powerful that even a man can be paralyzed, or die. Please note that this photograph is copyright © Jameson Hunter Ltd 2015. You will need permission from Jameson Hunter to be able to reproduce it.
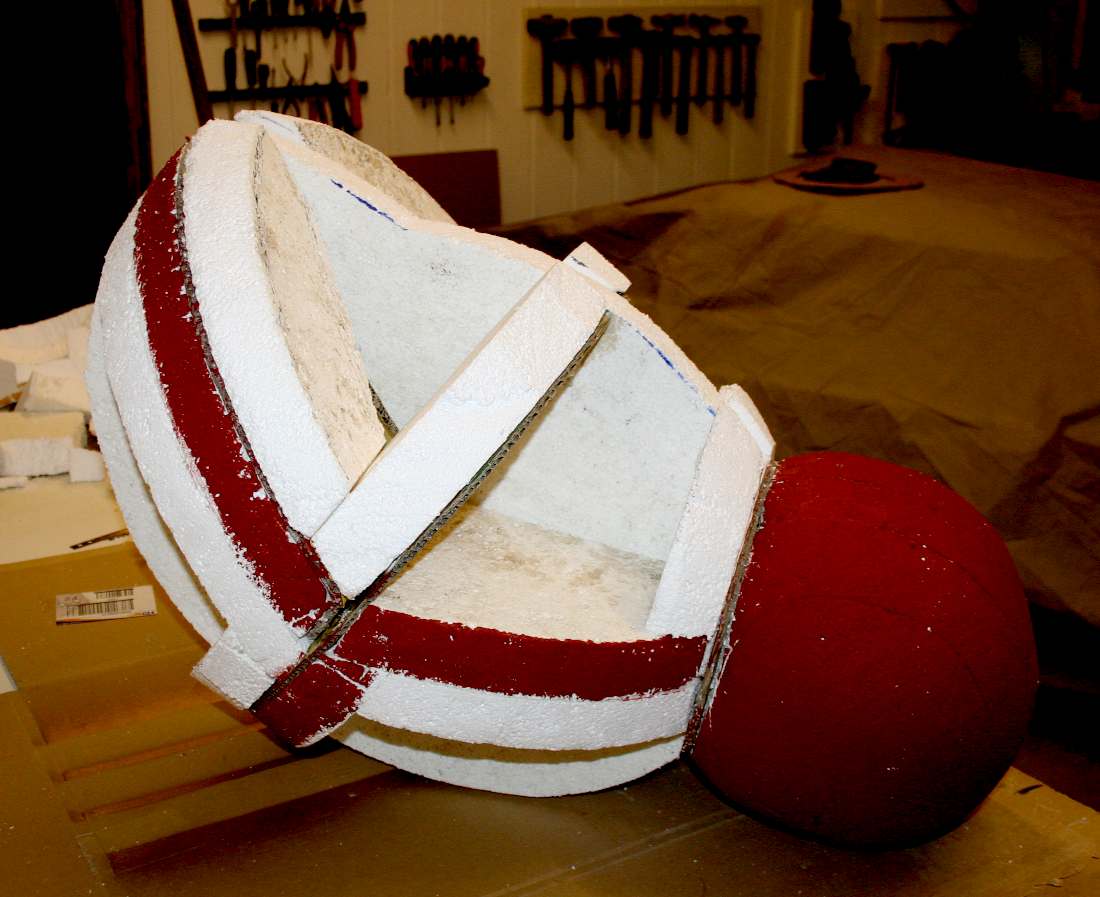
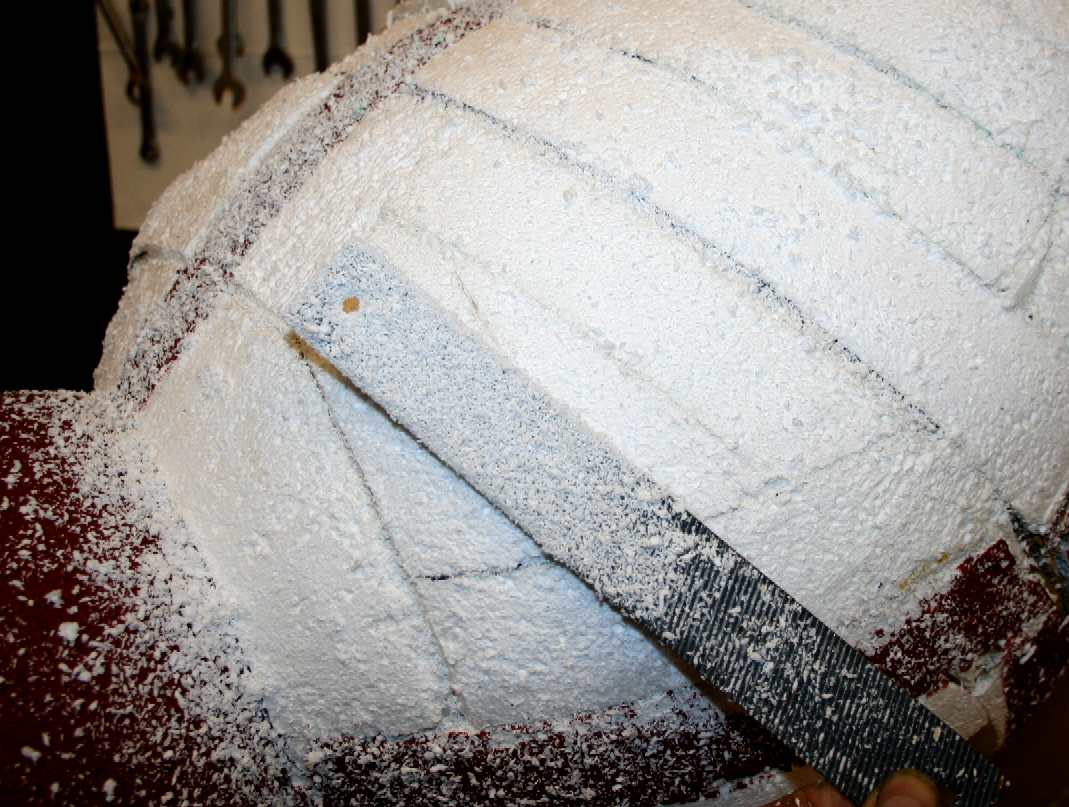
TAIL SHAPING STAGE 8 - Tip: as you have gone to all that trouble to cut and bond more than 50 sections, take your time when using a rough body file to get the final shape. Work from known edges (the ones sealed so you don't lose them) towards the quadrant spheres. Brush waste away frequently and pace yourself in between cups of tea, or whatever is your poison. Please note that this photograph is copyright © Jameson Hunter Ltd 2015. You will need permission from Jameson Hunter to be able to reproduce it.
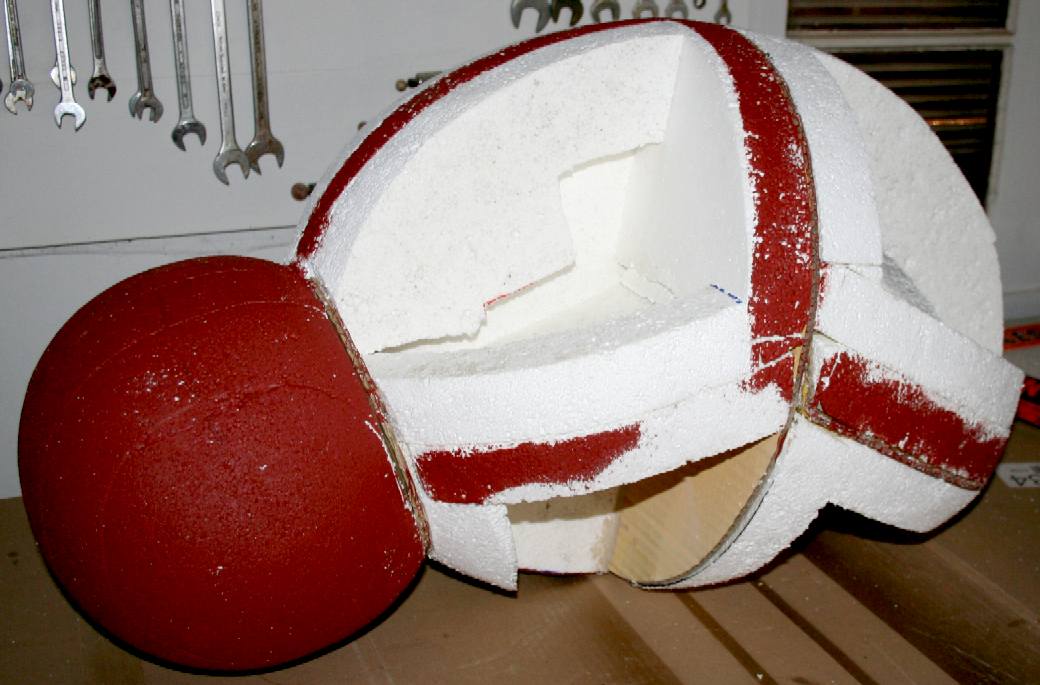
TAIL SHAPING STAGE 8 - That's nice and smooth, Details can be added later. One tail section is cut into the foam - with one more to go. In fact there are more, but too much detail in the master is not needed. That comes later by way of decorations or make up. Please note that this photograph is copyright © Jameson Hunter Ltd 2015. You will need permission from Jameson Hunter to be able to reproduce it.
TAIL SHAPING STAGE 8 - At this stage seal the whole body part using a contrasting shade. All of those ridges will need to be filled and smoothed, and finally a gloss coat applied from which to apply a release wax to make a female mould. High quality work at this stage will pay dividends. Please note that this photograph is copyright © Jameson Hunter Ltd 2015. You will need permission from Jameson Hunter to be able to reproduce it.
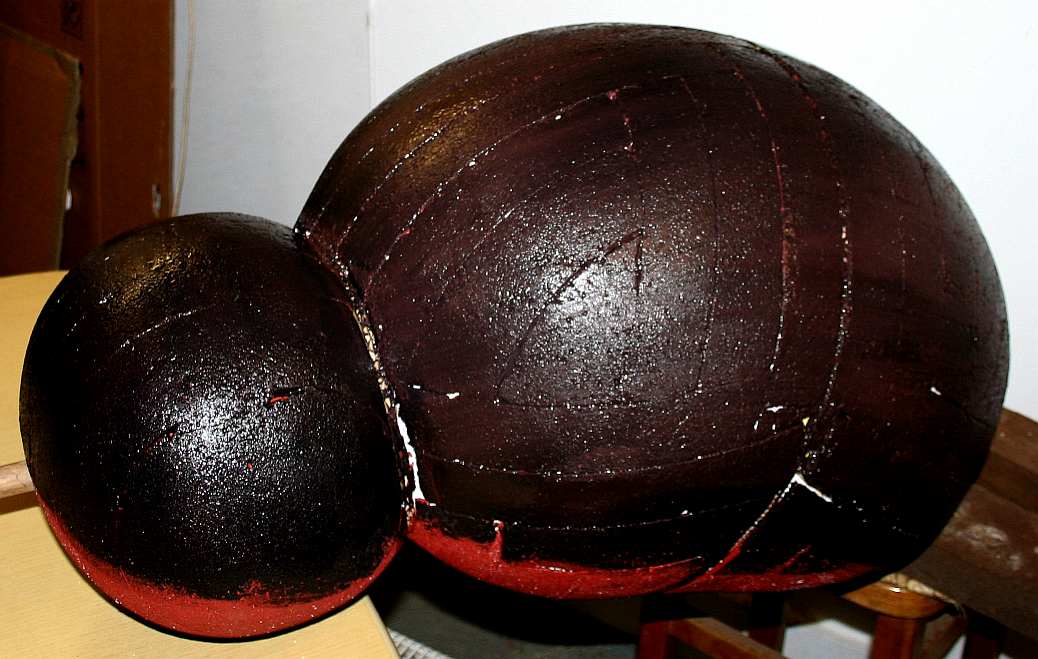
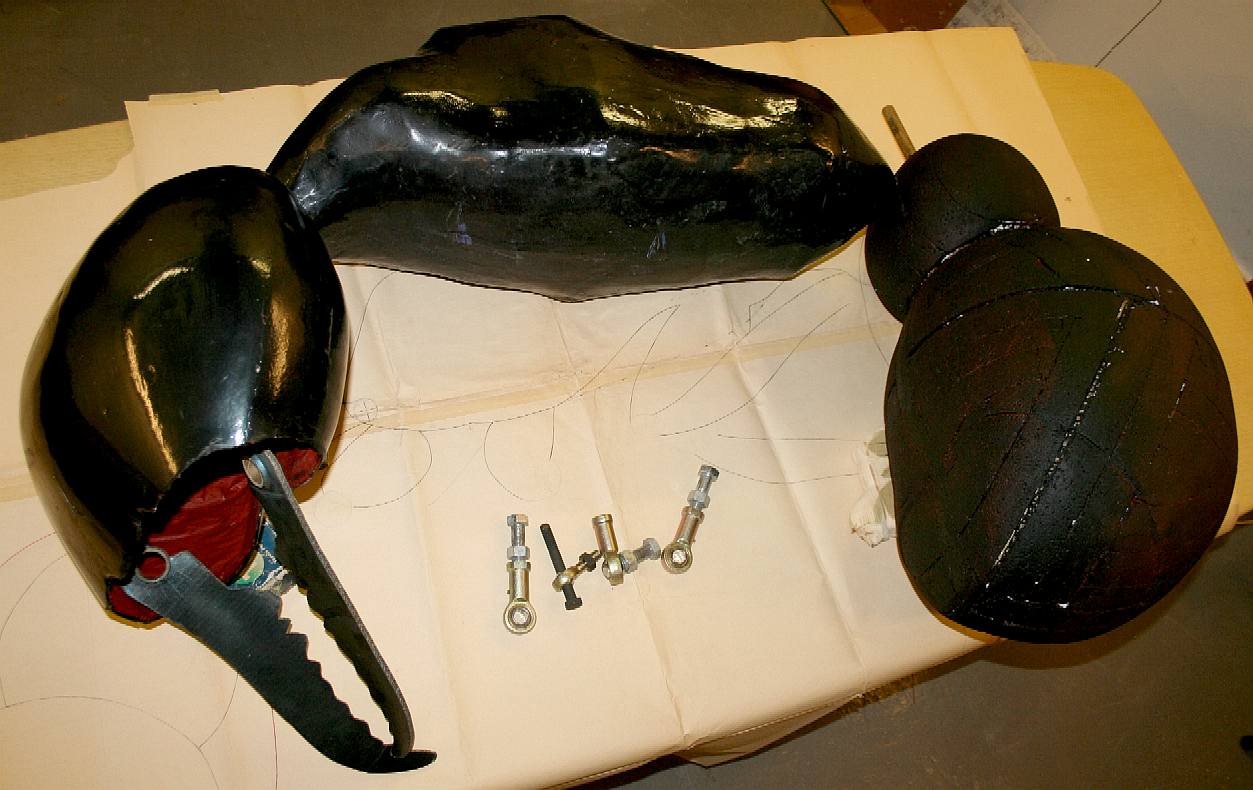
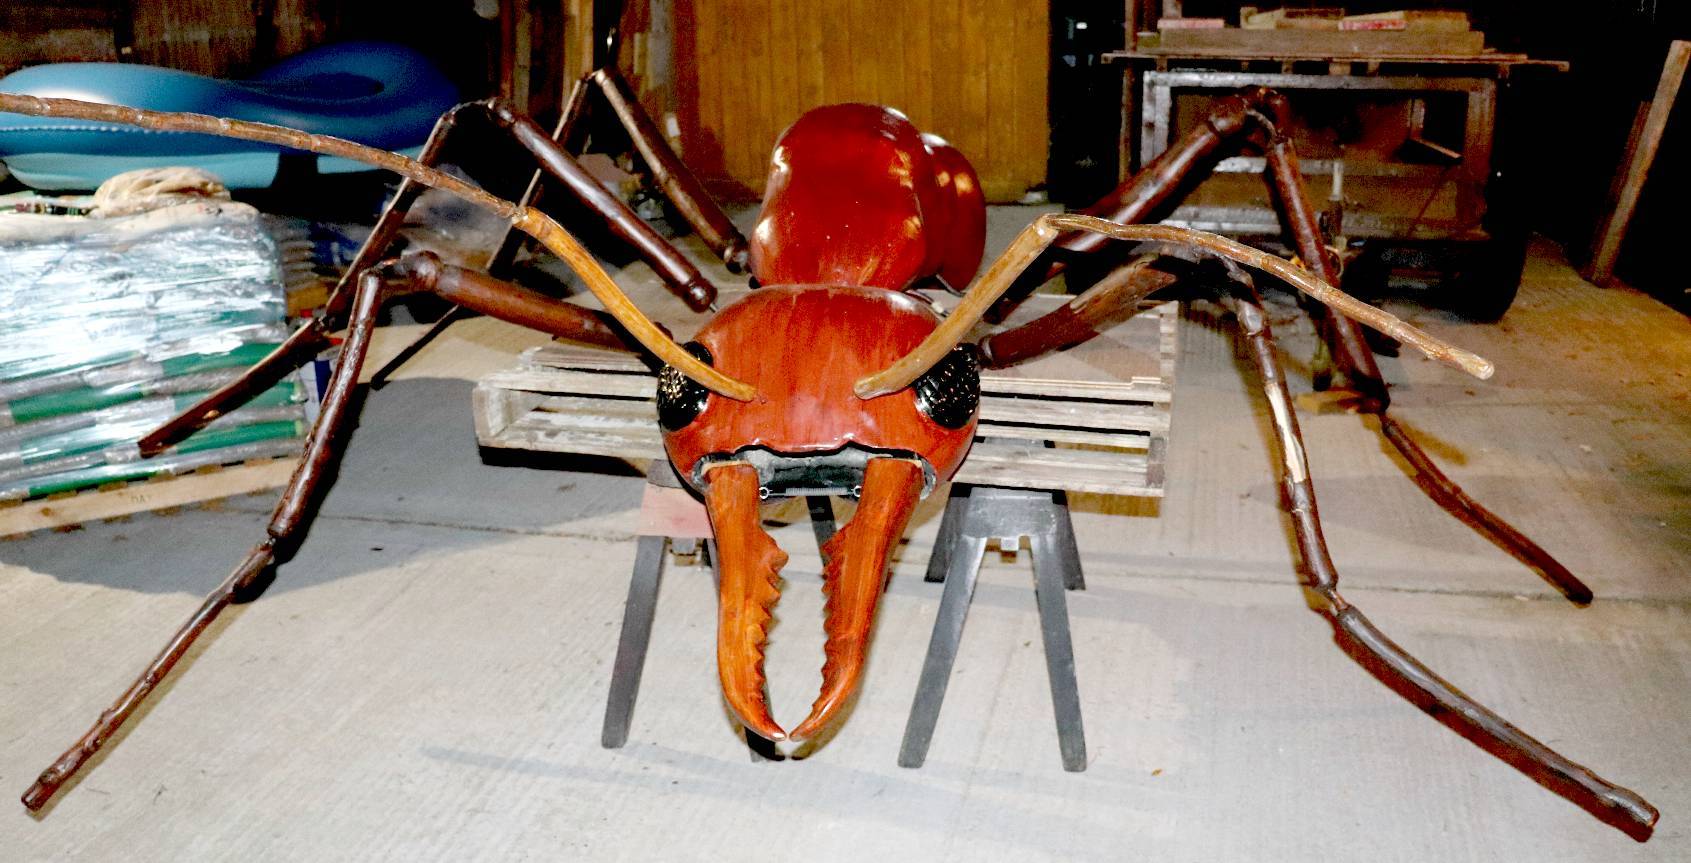
BODY PARTS - December 12 2015 - The three main body parts are shown here together; the tail is now black, but still needs surface finishing. Ants have a high degree of movement, as an engineering structure. That is because in the world they live in, combat between species is inevitable. The main weapon of an ant is the sting, which can be much modified to spray acid or release toxic gels. Please note that this photograph is copyright © Jameson Hunter Ltd 2015. You will need permission from Jameson Hunter to be able to reproduce it.
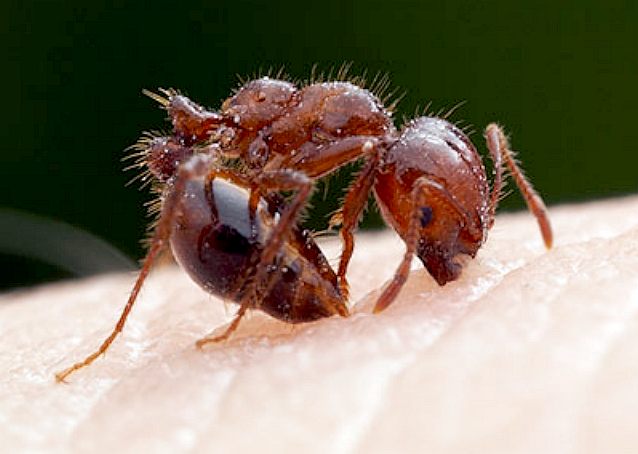
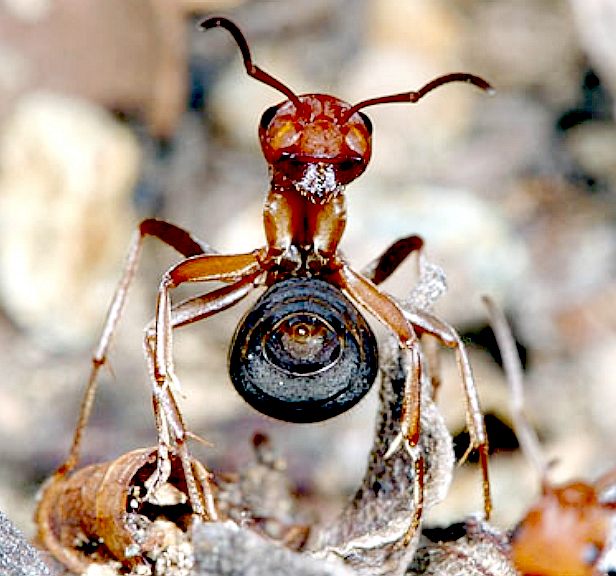
TAIL MOVEMENT - This is an example of how the tail must swing in under the body to inject a victim. First the ant bites the target with it's jaws to get a firm grip, it them swings the tail underneath to deliver the sting.
ACID SPRAY - In this picture you can see how the ant aims its tail as a warning not to come too close. It is not just a warning of course, if you become a threat, it will fire acid at you. If you are closer still, it will attack and bit you, then inject acid into the bite. Ouch!
LINKS & REFERENCE
Popular mechanics culture movies shark night 3ds predators blow jaws out of the water Chicago Zoological Park Illinois Brookfield Zoo Blog AL entertainment press register 2011 video giant_insects_exhibit Youtube Hexbug Vex robotic ant http://www.gngebike.com/apps/webstore/products/show/3019663 http://www.electricscooterparts.com/bicyclesprockets.html https://www.aldebaran.com/ http://www.softbank.jp/en/ http://lynchmotors.co.uk/ http://www.nestle.co.uk/ http://www.mufg.jp/english/ http://www.mitsubishielectric.co.uk/ http://www.maplin.co.uk/ http://www.autodesk.co.uk/products/autocad/overview https://en.wikipedia.org/wiki/Four-minute_mile http://www.bostondynamics.com/robot_bigdog.html http://www.discovery.com/ https://www.youtube.com/watch?v=O5a7xab7WRY http://zjmy-lu.en.made-in-china.com/product/YKNnjrEkZWVS/China-800W-36V-W-Bracket-Electric-Motor-Kit-W-Control-Box-Throttle-F-Scooter-My1020.html http://www.nydailynews.com/news/national/don-sex-robots-expert-article-1.2362308 http://www.theguardian.com/technology/2014/dec/01/nestle-robots-coffee-machines-japan-george-clooney-pepper-android-softbank http://www.theguardian.com/world/2015/sep/28/no-sex-with-robots-says-japanese-android-firm-softbank https://www.czs.org/Brookfield-ZOO/Home http://www.exploreum.com/ http://blog.al.com/entertainment-press-register/2011/01/video_giant_insects_exhibit_ar.html https://en.wikipedia.org/wiki/Them! http://www.imdb.com/title/tt0047573/fullcredits/ https://en.wikipedia.org/wiki/Mechatronics https://en.wikipedia.org/wiki/Animatronics http://www.instructables.com/id/Simple-Animatronics-robotic-hand/ http://www.robots.nu/robot-animals/ http://www.knbefxgroup.com/
Movie idea, lurking beneath the Antarctic ice is a discovery that scientists will die for. This story is now the subject of a low budget trailer to be produced mostly in the UK. The promoters are looking for backers. The UK will contribute 20% toward production costs. Roughly 60% of a low budget film may be pre-sold as distribution rights, leaving 20% finance to source. The deal is that investors recover 120% on their project stake within 12 months of shooting, with an income stream thereafter from networks and merchandising. Producers and directors please take note that there is a significant audience for well made movies of this genre. Look at what happened when they remade Godzilla.
A Sectasaur™ (thawed) - now on permanent display at Herstmonceux Museum, in Sussex, England.
ANTICS - ARDUINO - ARMOUR - ARTWORK - BIOLOGY - BLACK BOX - COMPUTERS - ELECTRONICS - ENERGY - FRAME - HEAD - JAWS - JIMMY WATSON - KITS - LEGS - MECHANICS - MOTORS - MOVIE - PHOTOGRAPHY - RASPBERRY Pi - R/C DRONE - SENTRY - SOFTWARE - SOUND PROOFING - SPEED - SUSPENSION - TAIL - WEAPONS - WARGAMING
DINOSAURS - DOLPHINS - HUMANOIDS - RAYS - SHARKS - WHALES
ARDUINO - ARM HOLDINGS - BEAGLEBOARD - MBED - PCBS - PICAXE - RASPBERRY PI
|
|
|
This website is Copyright © 2024 Bluebird Marine Systems Limited. The names Bluebird™, Bluefish™, Miss Ocean™, SeaNet™, SeaVax™ are trademarks. All other trademarks are hereby acknowledged.
|